

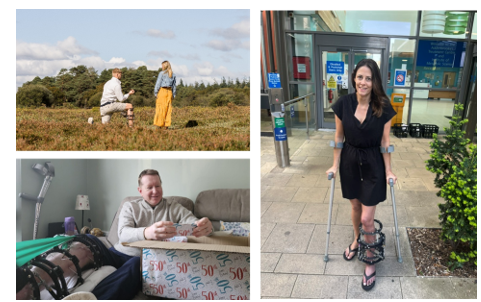
Please read this booklet carefully. It may be useful to bring it with you to every appointment.
- Introduction
- Purpose of the external fixation
- Types of frame
2. Before Your Operation
- Pre-operation assessment
- Smoking
3. In Hospital After Surgery
- What to expect on the ward
- Managing your pain
- Mobility and stairs
- Occupational therapy
- Preventing falls
- Goals required to go home
4. Looking After Your Frame at Home
- Frame adjustments
- Frame prescription
- Struts
- Bone transport
- Dice and Clickers
- Pin site care
- Swelling Management
- Managing muscle cramps
- What to do for loose wires
5. Daily Life with a Frame
- Psychological wellbeing
- Sleeping
- Sitting
- Clothing and Footwear
- Travel
- Returning to work
- Nutrition
6. Physiotherapy
- Stretching
- Strengthening
- Gym based exercise
- Hydrotherapy
7. Follow-Up and Further Recovery
- Follow-up clinics
- Research
- Frame removal
8. Resources and Contacts
- Useful resources
- Contacts
1. Introduction
What is the purpose of external fixation?
It is a way of stabilising pieces of broken bone using an external framework of rods, wires and rings rather than internal metalwork. This can sometimes be used as a temporary frame which allows soft tissues to settle or can also be used for longer periods of time for a number of reasons.
These are listed below:
- Fixation of fractures especially a fracture with more than two to three pieces.
- Non-union of a fracture (the bones not healing) or an infected fracture.
- Correction of bony deformities.
- Lengthening of a limb that cannot be done with a limb lengthening (self-distracting) nail.
- Correction of soft tissue deformities.
- Arthrodesis (fusing of a joint).
- A bone defect which will need new bone to grow.
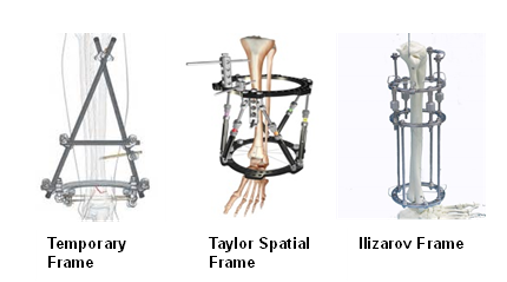
With a temporary frame you will not be able to put weight on the limb. The temporary frame will be converted to either a nail inside the limb or a Taylor Spatial Frame (TSF) which is the circular frame outside the body. The treatment depends upon the fracture/break.
With a circular frame you are likely to be encouraged to weight bear through the limb. This is to promote and stimulate bone formation. You will be guided by the team regarding whether you can put weight through your limb or not.
Taylor Spatial Frames are predominantly for fixation of fractures. The length of time the frame is worn can vary depending on healing and any deformity corrections required.
An Ilizarov frame is a very simple frame that only moves bone up or down, while a TSF will allow movement of the bone, in more directions to move the fracture to the correct position. A TSF is also much easier to adjust for more complex fractures.
The Taylor Spatial Frame (TSF)
The bone transport frame is in addition to the TSF, which uses the body’s natural ability to grow healthy new bone and soft tissue.
The bone that was broken (fractured) in the accident is moved into the correct position using the TSF, which has adjustable struts that get moved following a special prescription, which is generated on computer software for each patient individually. This prescription will be given to you while you are in hospital and when you attend clinic if further adjustments are required.
The team will ensure that you are taught how to do these adjustments before you are discharged from hospital.
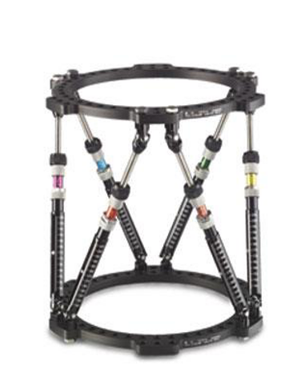
This is the Taylor Spatial part of the frame and this is the part that will move the fracture/break into the right place by moving the struts.
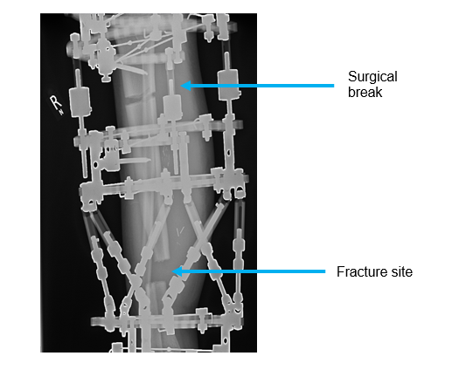
A TSF X-ray image showing where the healthy bone has been cut (the blue line) the second line shows the fracture (the yellow Line).
Frame Adjustments
During the time you are wearing the frame you may be asked to complete frame adjustments to help with the alignment or lengthening of the bone as it heals. A frame “prescription” will be given to you by the team and you will be shown how to adjust the frame. This prescription is a computer generated prescription which will show you a list of numbers in a table from 1-6. This relates to each strut and its number.
The frame adjustment is done daily and will usually be 1-2mm per day. Each strut is numbered and colour coded so you can identify from the prescription which strut to alter.
The team will give you your prescription either while you are in hospital or at your out patients appointment. They will go through it with you and explain how it works. Once you have done your frame adjustment for the day it is advisable to tick or cross through that day so that you do not get confused
Frame Prescription
You will be given the prescription in this format while in hospital and in clinics as required. This is an A4 piece of paper, which you tick each day when you have adjusted your frame as instructed by the prescription.
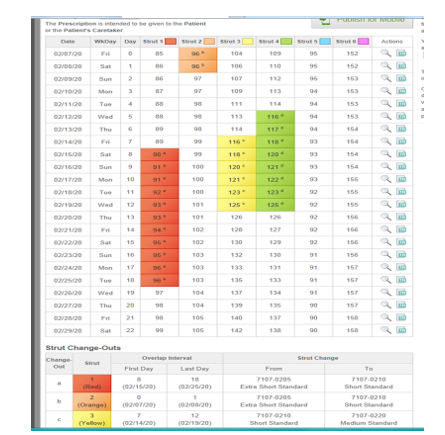
Once the broken bone ends are in the right position you will stop being given frame prescriptions. The team will review your xrays each time you come to clinic and will let you know when to stop.
After this the team will monitor the bone healing, this can take some time, so at this stage you will be booked into clinic less frequently normally every 4-6 weeks.
Struts
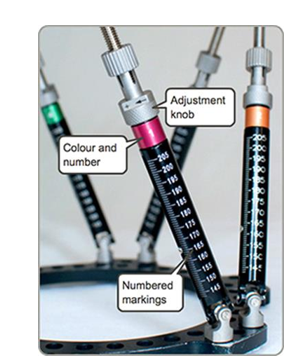
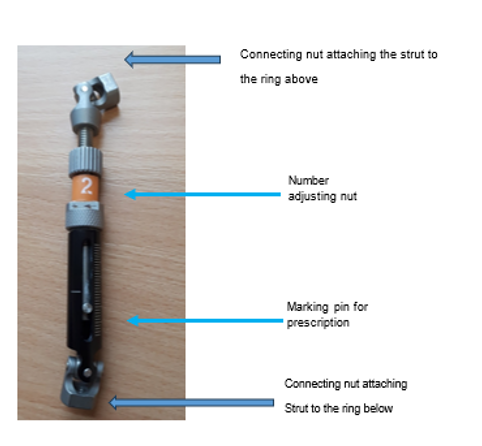
The frame is adjusted by moving the little metal pin up and down on the strut. This is done by turning the strut following either the + to go up or the – to go down as the number on the prescription tells you.
You need to check that the little metal pin on the side of the strut that is set to the number on the prescription. You may need to change the strut itself if it is not long or short enough for the prescription to continue.
The prescription for that particular strut that needs to be changed will be highlighted in grey or the colour of the strut if produced in colour.
The team will give you the struts that you need before you go home, or at the clinic, so that you will be able to do this at home. However, do not worry if you do not have anyone to help you with this or you are struggling as you can come back to clinic to have this done.
How to Change a Strut
The Specialist Nurse will teach you how to do this
- You will need two 10mm spanners and the new strut. You will need to purchase the spanners yourself, which can bought from hardware stores.
- Wash your hands.
- Identify which strut/ struts need changing – it can be more than one and if you follow the prescription from strut one to six it stops you getting confused.
- Do not loosen the other struts that do not need changing.
- Attach a spare strut, given to you for strut changes, onto the frame next to any strut. (You will be shown how to do this before a strut change is needed.)
- With one of the spanners hold the grey top part of the strut that is attached to the black ring and with the other spanner hold the nut that is the other side of the black ring holding the strut in place.
- Then holding one spanner still, turn the other spanner down to loosen it – remember ‘lefty loosey’ – to loosen turn to the left.
- Once this screw is loose then repeat the process with the other end of the strut that is attached to the ring below. Continue this until the strut comes completely loose and off the frame. Then go back to the top of the same strut to completely unscrew and remove the strut.
- Do not take the screws out completely in case you forget which hole they have come from, in which case you would not know where to attach the new strut.
- Then get your new strut which you have checked with the prescription and do the process in reverse, this time tightening rather than loosening – remember ‘righty tighty’ – turn to the right to tighten. If you have forgotten which hole the strut should go into, you will usually find a white circle around the hole.
- Once this is done check that all the struts on the frame are tight and tick the prescription for that day.
- Attach the metal or plastic clip with the strut number on it onto the newly changed strut.
- Do not forget to remove the extra strut that you put on first to give the frame stability for the strut change.
When you come back to clinic please bring the old struts with you.
Bone transport
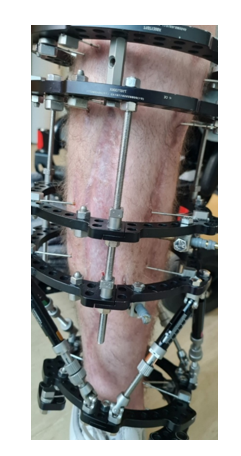
As well as a TSF to support and position the fracture, bone transport may also be required. The first part of this process is done in theatre, the surgeon will cut/break healthy bone (corticotomy) above or below the break (fracture). The surgeon may break the bone in two areas if there is a lot of missing bone that will need to have new bone grown into the gap. The bone will then be moved either up or down using the frame. This is done by using clickers or dice mounted into your frame.
In general, you will be advised to do 1 click per clicker or dice 4 times per day if there is one level of clickers or dice. If there are two levels it is one click or ¼ turn for dice on the upper level and two clicks/half turn of the dice on lower level four times a day. The team will tell you which way to turn the dice or clickers.
The dice or clickers will then push the rings they are connected to apart very slowly. New bone then grows within these new gaps. This process continues until both legs are equal length. This will be checked every time you come to clinic for a review.
This process will dock (link) the bone onto the fracture site in the correct position and healthy bone will grow in the cut or break that was made in theatre.
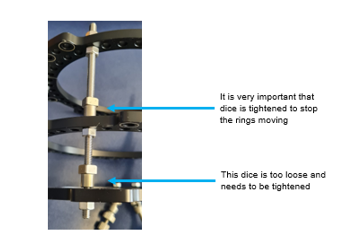
Dice
The bone that has been broken by the surgeon (the corticotomy/ies) is moved apart using either dice or clickers.
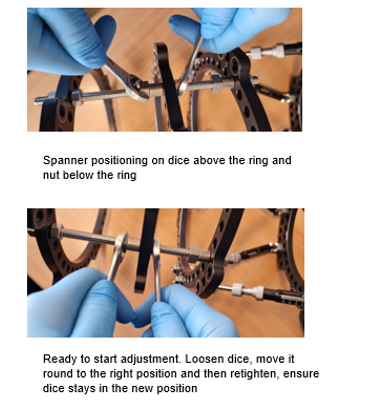
The dice are moved using two 10mm spanners and it is easiest to move the top 3 dice first and then if there is another level of dice the bottom level do these after the first level. This stops confusion in remembering once each one has been done.
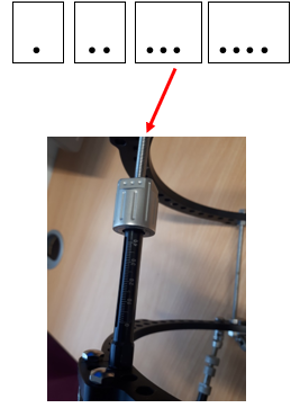
The dice have four faces and each quarter turn shows different dots.

How to move the dice
The team will tell you in which direction to turn the dice and you will be given a chart with this written on in case you forget and you can tick this each time you move them.
Clickers
The clickers normally need to be moved one or two clicks (which you can hear and feel) four times a day. Depending upon if there is one surgical break (corticotomy) or two. You will be asked to turn the clickers following the direction of the dots on the clickers, either upwards or downwards and the team will tell you whether you count the clicks/dots up or down over the day.
This moves the rings 1mm in total per day – this represents the amount of bone grown in a day.
Dots corresponding to the dots on the clicker.
You will also be given a clicker chart and you can either tick or cross out each section each time you move them. This stops you forgetting whether you have done it or not.
Normally strut adjustments can be stopped and restarted at any time. Clicker or dice movements cannot be so do not stop this until the team instruct you to do so.
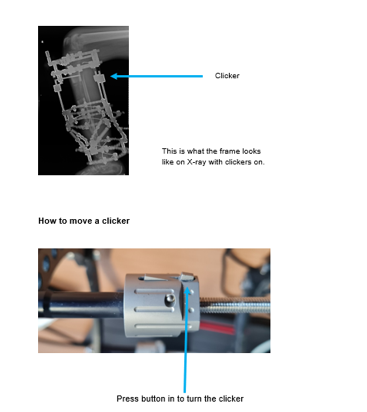
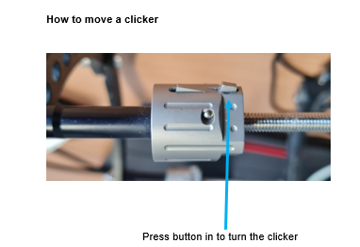
You will be told which way to turn the clicker and it will be written on the clicker/dice chart.
As you move your clicker in time the metal bar connecting it to the frame will move out of the clicker, as you lengthen the bone. When it gets to the stage below you need to contact the Limb Reconstruction Nurse so that this can be re set.
There are always three dice or clickers in between each set of rings that have a corticotomy.
The clicker or dice chart
This will say which direction to turn the dice or clickers to avoid confusion.
| Date | 08:00 | 12:00 | 16:00 | 20:00 |
|---|---|---|---|---|
| 13/12/2025 | 08:00 X | 12:00 X | 16:00 X | 20:00 X |
| 14/12/2025 | 08:00 X | 12:00 X | 16:00 X | 20:00 X |
| 15/12/2025 | 08:00 X | 12:00 X | 16:00 | 20:00 |
| 16/12/2025 | 08:00 | 12:00 | 16:00 | 20:00 |
Pin Site Care
This is only for pin sites which are leaking. It is common for pin sites to ooze clear/yellow coloured fluid.
- Wash hands with soap and water.
- Slide plastic clip up the pin, remove the gauze and throw away.
- You can shower, providing the last stream of water rinses your leg and the frame.
- If you do not have a shower the pin sites can be cleaned over the bath or using a washing up bowl. With a jug rinse the limb and frame until clean.
- Then dry with a clean towel, face cloth or hair dryer (if using this use on cool setting otherwise the frame may over heat causing damage to the skin and new bone).
- Wash hands again.
- Clean scissors using chlorhexidine (pink spray) or Octenisan before starting pin site care.
- Clean each pin individually by wiping skin around the pin or wire using chlorhexidine/Octenisan soaked clean gauze or cotton bud. Always wipe away from the pin. Once you have cleaned the skin clean the pin/wire from the skin upwards.
- It is very important to use clean gauze/ cotton bud for each pin/wire.
- Do not remove dry skin from the pin site and do not try to mobilise the skin around the pin sites or try to push it down as this will cause irritation and inflammation which can in turn lead to pin site problems.
- If the pin site is oozing this is to be dressed with gauze and a white clip.
Pin Sites
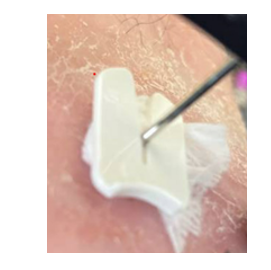
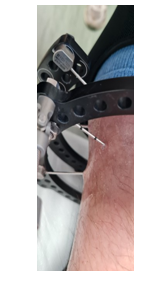
Healthy pin sites:
- Look clean
- Are not oozing
- Are not swollen
- Are not red
- Are not painful
Irritated pin sites:
- Can be painful where skin touches the pin
- Red around the pin site and ooze clear, straw-coloured fluid
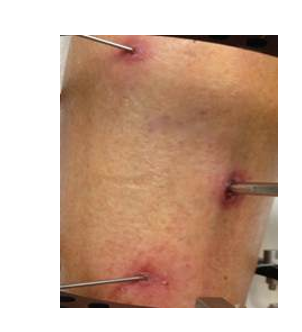
Infected pin sites:
- Very oozy, may have pus coming out of them
- Very red
- Swollen skin, the limb may also be swollen
- Painful to touch
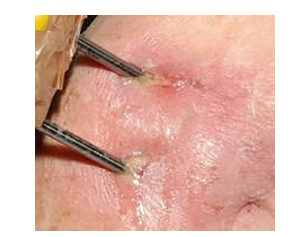
This is normally treated with a course of tablet antibiotics you do not need to be admitted to hospital for this.
2. Preparing for your surgery
Before your operation takes place, you will be seen by the clinical nurse specialist and the clinical specialist physiotherapist who work within the limb reconstruction team.
This may be on the ward or the in clinic. You are encouraged to bring along a supporter who may be a spouse, relative or friend supporting you.
It will include an assessment and education about the limb reconstruction journey. At this time you will have the opportunity to ask any questions you may have.
You will be shown a frame and taught how they work at this time you are given you patient information book. This book has the contact numbers for the team on the last page so you can contact them for any concerns.
The Specialist Nurse will list you for surgery and will phone you directly with the date, time and instructions on where to come to. If you have had a Plastics procedure they will check with Plastics when the skin and soft tissue is ready for listing and then contact you after that.
What to bring in:
- Your signed consent form.
- Regular medication.
- Day clothes - including wide leg trousers, shorts, dresses or skirts.
- Swimming costume - as you may have hydrotherapy with the Physiotherapists as an in patient.
This pre-operative education is very important and we encourage you or your supporters to engage with this session.
Smoking
Smoking delays your wound healing and increases the risk of you developing blood clots. Smoking also increases the risk of developing severe infections. If you cannot stop smoking, then please make an appointment with your GP or practice nurse to arrange nicotine replacement therapy to cover your symptoms while you are in hospital. If you are an inpatient, please discuss this with the team.
For more information on reducing smoking, please visit:
Remember we are a totally smoke-free site. Please do not bring any other smoking devices such as vapes or e-cigarettes into hospital as you will not be allowed to use them on the hospital site.
3. The Day of Surgery
The Specialist Nurse will have told you were to go to, it is normally the Day Surgery Unit (DSU). The nurses there will get you ready for your operation. The surgeons and the anaesthetist will also come and see you before your operation..
Please remember to bring your consent form with you otherwise your surgery maybe cancelled. If you have lost it or it has got damaged please contact the Limb Reconstruction Nurse before the day of surgery that that she can arrange a new one to be filled in with you.
After the operation you will then be taken to the ward.
4. In hospital after surgery
What to expect on the ward?
On return to the ward, you will have pink coloured gauze around the wires, which are held in place with white clips. These will be removed 48-72 hours after your surgery.
Your pain will be managed with medication given by the nursing staff, please tell the nurses if you have pain and they can give you additional pain relief. Your observations will be performed at regular intervals to monitor your progress.
After the procedure, the therapists or nurses will attempt to sit you on edge of bed or stand with a frame to start with, when appropriate to do so. This may be a few hours after your procedure, it is likely it could be the next day. Further assessments will be completed to ensure you are given the most appropriate walking aid, most often crutches.
You will routinely have a post-operative X-ray and you may have routine blood tests. It is normal to have mobilised with the ward staff prior to this X-ray.
These results will then be checked by a member of the limb reconstruction team and will aid the frame prescription which may be taught while you are still an inpatient or when you are seen in clinic.
Pain
To help with your treatment, it is important that you have adequate pain relief. Pain levels can vary but can be higher immediately after your operation, when you are starting to weight bear and as you complete frame adjustments.
The team will aim to ensure your pain relief is adequate. Please inform someone if you are struggling so alternative medications can be explored, it is not as simple as one medication suits all.
When you are discharged from hospital you will be given pain relief to take home that will be the same as you had in hospital. You will be reviewed regularly in clinic and your pain discussed. If you are suffering high levels of pain, following discharge from hospital, please seek advice from your GP or contact the Limb Reconstruction Nurse.
Mobility
The therapists and nursing staff will help you after your surgery to learn the following techniques in relation to getting in and out of bed, mobilising with a walking aid, washing and dressing with appropriate aids and completing steps and stairs to ensure you are safe to return home and maximise your independence.
Stairs & Steps
Initially, it is better to go up or down the stairs or steps one step at a time. Use the banister or rails if you have one.
Going Up:
- Place the non-operated leg on the step first.
- Followed by the operated leg.
- Then, the crutch or stick. Repeat the process.
Going Down:
- Place your crutch or stick on the step first.
- Followed by the operated leg.
- Then, your non-operated leg. Repeat the process.
This technique remains the same if you do not have a banister or rail on your stairs or your front doorstep or kerb. You will use 2 elbow crutches instead and apply the same technique. The therapists will practice steps and stairs that replicate what you have at home with you before you are discharged.
Occupational Therapy
If any adaptations or specialist equipment is required you will be reviewed by the occupational therapy team and appropriate equipment arranged.
Falls
Falls can occur at any age and lead to injury, increased risk of infection and a prolonged hospital stay.
People in hospital can fall for a variety of reasons such as:
- General weakness or reduced balance following surgery.
- Sudden changes e.g., needing the toilet, feeling dizzy or confused.
- New medication.
- Poorly fitting footwear.
To reduce your risk of falling while in hospital and at home:
- Wear your glasses.
- Avoid reaching out for things.
- Wear non-slip good fitting slippers or shoes.
- Call for assistance from relative or nursing staff if required.
- Use walking aids as prescribed.
- Check with the nursing or therapy staff if you are safe to mobilise independently.
- Remove hazards such as any loose rugs or mats that could be slip hazards.
What do I need to achieve in order to go home?
There are some common goals, which may include:
- Pain well controlled.
- Ongoing plan established.
- Post-operative X-ray.
- Frame prescription, if required.
- Follow up appointments and onward referrals requested.
- Able to mobilise and do the stairs and steps safely, if you are required to do these at home.
However, every patient is treated individually, dependent on their injury.
5. Daily Life with a Frame
Psychological Wellbeing
Having a fixator can have an impact on your emotions and your psychological wellbeing. The circumstances which led to needing a fixator (e.g. a traumatic injury), hospital admissions and lengthy treatment, the impact on your day-to-day life as well as factors such as pain and disturbed sleep can lead to a range of difficult psychological symptoms including:
- Feeling helpless, doubting yourself.
- Feeling angry (at yourself, at other people, at the world).
- Feeling isolated from other people.
- Feeling sad and more tearful than usual.
- Loss of motivation.
- Feeling worried or anxious.
- Problems sleeping.
- Intrusive memories (flashbacks) or nightmares about traumatic events.
- Feeling that you cannot cope with physical pain.
These reactions are understandable, especially in the early stages of your treatment as you adjust to everything that has happened. However, it is important to take care of your psychological recovery alongside your physical treatment. The following things can help with psychological recovery in the early days:
- Try to establish a daily routine including making time to do things that you enjoy.
- Pace yourself, it is important to combine activities with time to rest and recover.
- Look after yourself: eat well, establish a healthy sleep routine, exercise, reduce alcohol and caffeine.
- Spend time with people you feel close to. If you want to, it may help to talk about your experiences, to express your feelings about what has happened.
If you feel that difficult emotions are becoming hard to manage or getting in the way of your life it is important that you seek advice – effective treatment include evidence based talking therapies and/or medication.
Accessing Psychological Support
You can access psychological therapy for common mental health difficulties (e.g. depression, anxiety, PTSD) by self-referring to your local NHS Talking Therapies Team.
More information about your local service and the self-referral form can be found by entering your GP details via the link below.
If you do not feel that the Talking Therapies Team are right for your needs, you can make an appointment with your GP to discuss other options for local mental health support.
If you need urgent mental health support, please call NHS 111 and select the mental health option or go to your local A&E. These services are available 24/7.
Please always feel free to discuss emotional difficulties with your hospital team. We can help you identify appropriate support.
Family and friends may also be experiencing emotional difficulties as they adjust to what is happening to you. The information above may therefore also apply to them.
Sleeping
Sleeping on your back is likely to be the most comfortable position. On your side is also possible with the fixator leg uppermost.
A beanbag or pillow can be used to rest the leg as it will offer good support and prevent the leg from rolling.
If you share a bed try to sleep on the side that you do not have your fixator on so it is less likely to interrupt your partner's sleep.
Sitting
Sitting should not be restricted with a frame on the lower leg but can be difficult with a frame on the thigh. Regular changes in position are recommended. If the leg is swollen or you have done a lot of walking elevate the leg to reduce swelling.
Clothing & Footwear
Depending on the size and position of your frame, you may not be able to get your regular clothing or footwear on. You can adapt shorts or trousers to fit over the rings of your frame using zips, velcro or extra panels. Frame covers and adaptive clothing can be purchased online.
Your physiotherapist will advise on footwear when you start to weightbear; you may need a larger than normal shoe size to account for swelling in the foot or have to adapt a shoe to fit around your frame. You may also be referred to orthotics for specialist footwear or a shoe raise.
In hot weather ensure that your frame is not in direct sunlight for too long. Just cover it with a light covering like a pillowcase to stop the metal getting too warm.
Swelling
Swelling of the limb is normal for the first few weeks following surgery and for some time after. It can also fluctuate with your activity. Sometimes if you have done too much the limb may swell.
It is important then to elevate the limb and rest.
If the swelling does not settle, please seek advice from your GP.
Cramp
It can be quite common to suffer with cramp. The best way to help settle this is gentle massage to the muscle, where you can, and gentle movement and stretches (see exercise section).
Loose Wires / Pins
Occasionally there can be loss of tension or a wire may snap.
This is not an emergency, but you should contact the Limb Reconstruction Nurse on 07759135036 or email elizabeth.shirland@nhs.net who will advise you on what you need to do.
Travel
You will be able to travel in the passenger seat of a car with the seat pushed back and pillow support for comfort.
There is no reason why you would not be able to use public transport. You may just need to plan your journey and consider access to buses or trains.
Driving
After all surgery you can only drive if you can safely do an emergency stop. You must also tell your insurance company about the injury to ensure that you are still covered.
Flying
If you are planning to travel by plane, this should be discussed with the medical team, as there is the possibility of developing blood clots in the limbs or lungs. You may be offered blood thinning injections to try to reduce the risk.
You must also inform your travel insurance company and the airline.
We are unable to write statements confirming that you are medically fit to fly as this decision will rest with the Airline.
You may set off the airport scanners.
Try to keep your limb elevated as much as possible as it will swell.
Returning to Work
Depending on your job, you may be able to return to work. However, this will depend on how much physical activity is involved in your job and how you travel to work. Please discuss your occupation with your physiotherapist, consultant or the team and they will advise you appropriately and provide certificates for work as required.
They will also be able to assist you with discussions around modified activities, redeployment and graded return to work.
Nutrition and Eating Well
Along with giving yourself time to rest and recover, choosing the right foods after surgery can have a significant impact on your healing process. The best foods to eat after surgery provide your body with the nutrition it needs to help create new tissue and reduce your risk of complications. It is recommended to eat a variety of fruit, vegetables and lean meat for sources of protein and iron. Try to drink 6-8 glasses of water a day.
For more information, see:
6. Physiotherapy
Often the frames can restrict your movement at the joints above and below - the knee and ankle. This is due to the wires and pins. Therefore you are at risk of developing muscle contractures in these areas. A muscle contracture are when muscles become permanently tight and shortened.
In order to reduce the risk of muscle contractures, it is recommended that you follow the advice given by the physiotherapy team.
Every patient’s advice will be specific to them, as some will have other injuries.
This is a comprehensive list of exercises that your physiotherapist may or may not instruct you to complete, depending on your injuries.
However, ideally we would like to maintain:
- A straight knee, that is also able to bend as far as possible.
- A flat foot that you can put onto the floor.
- Strong arms and legs (depending on other injuries).
- A good level of mobility in an upright position.
We have some evidence to show us that exercising your non-injured limb (if permitted) can improve your recovery on your injured limb.
Exercise is good for your health and mood. Many patients use the gym, fitness classes, the pool and other methods to do this. Whether you exercised before your injury or you’re wanting to try and improve your health and fitness now, the physiotherapy team can help guide you with this.
Stretching
These stretches are key for reducing the risk of developing muscle contractures. We advise that you do these as a minimum 3 times per day. You may be instructed to do this more often if you are developing stiff muscles which may form a contracture.
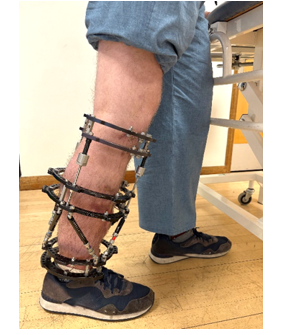
Standing Calf Stretch
- In standing, hold onto a sturdy support with both hands.
- Stand in a walking position with the leg to be stretched straight behind you - this may only be slightly to start with.
- Bend your front knee and keep your back leg straight. Try and keep your back heel on the ground.
- Lean your body forwards and down until you feel the stretching in the calf of the straight leg.
- Hold for as long as you can tolerate and repeat to ensure you have completed 5 – 10 minutes of stretching in total.
- Repeat this exercise 3 times a day.
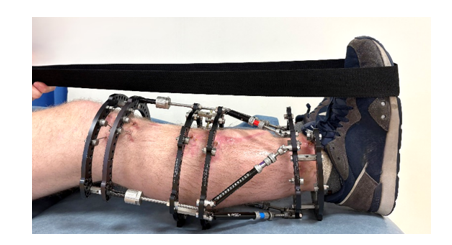
Seated Calf Stretch
- Sit on a chair or bed with a strap around your foot as shown.
- Pull the top of foot (not toes) toward your body so that you feel a stretch in the back of your leg.
- Hold for 30 to 60 seconds (or as long as you can tolerate) and repeat 5 times.
- Repeat this exercise 3 times a day.
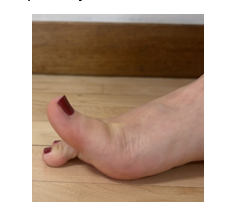
Active Great Toe Stretch
- Sit with your foot on the floor or bed.
- Lift your big toe, keeping your other toes on the floor.
- Hold for 5 - 10 seconds. Repeat 10 times. 3 times per day.
Passive Great Toe Stretch
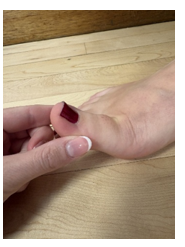
- Bend your big toe up with your fingers. If you are unable to do this, ask someone to help move your big toe up as far as possible.
- Hold for 5 - 10 seconds at the end where you can feel a stretch.
- Repeat 10 times. 3 times per day.
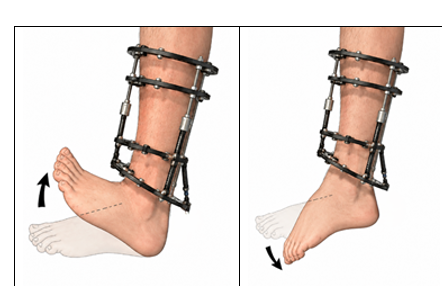
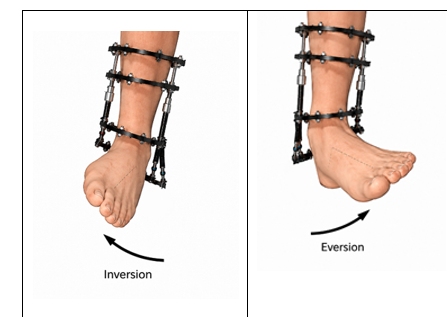
Ankle Movement
In whatever position feels comfortable to you, practice taking your foot into the following movements.
- Up
- Down
- Inwards (Inversion)
- Outwards (Eversion)
Try 10 – 30 times in each direction, 3 times per day.
These are a few different stretches for the back of your knee and the muscles at the back of your thigh, called the hamstrings. You can do them all or just the ones that feel most beneficial to you.
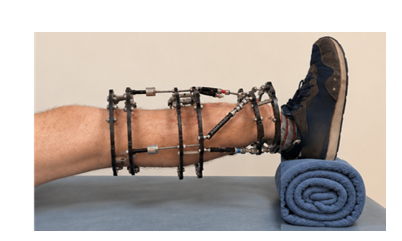
Heel Prop
- Lying down or slightly sat up, place a rolled-up towel or blanket under your heel.
- Relax in this position. You should feel the muscles stretching at the back of the knee.
- Hold for as long as you can tolerate and repeat to ensure you have completed 5 – 10 minutes of stretching. You may need to build up to holding this stretch for this long.
- Repeat this exercise 3 times a day.
Chair Stretch
- Sitting on a chair, place your heel on another chair or foot stool and relax.
- Relax in this position. You should feel the muscles stretching at the back of the knee.
- Hold for as long as you can tolerate and repeat to ensure you have completed 5 – 10 minutes of stretching. You may need to build up to holding this stretch for this long.
- Repeat this exercise 3 times a day.
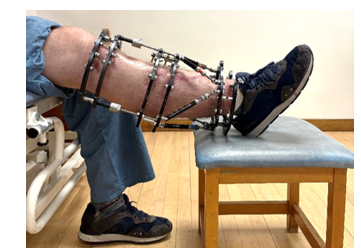
Seated Hamstring Stretch
- Sitting on a chair, place your heel in front of you with knee straight.
- Relax in this position. You should feel the muscles stretching at the back of the knee.
- Hold for as long as you can tolerate and repeat to ensure you have completed 5 – 10 minutes of stretching.
- Repeat this exercise 3 times a day.
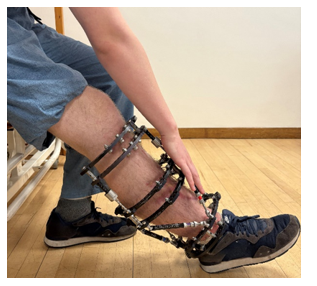
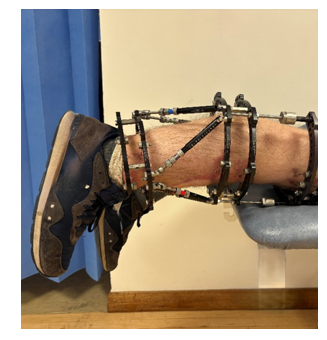
Lying Stretch
- Lying on your front with your leg hanging off the edge of your bed.
- Relax in this position. You should feel the muscles stretching at the back of the knee.
- Hold for as long as you can tolerate and repeat to ensure you have completed 5 – 10 minutes of stretching.
- Repeat this exercise 3 times a day.
Strengthening
Strong legs are key for daily activities such as walking and climbing stairs. We advise that you do these as a minimum, twice a day. You may be instructed to do this more often if your strength is not improving.
Knee Bends
- Lying down on the bed, gently slide your heel up and down bending the knee as far as possible.
- Hold for 5 – 10 seconds in the bent position.
- It may make it easier to place the plastic bag or tea tray under the leg.
- Repeat 10-30 times.
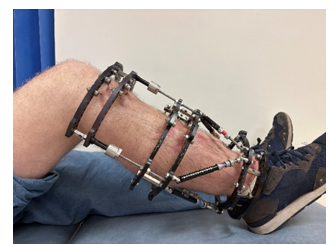
This exercise helps bend your hip and knee and also strengthen the muscles at the front of the leg.
Knee Squeezes
Lying down or slightly sat up, squeeze the knee into the bed so that it’s straight.
Hold for 5-10 seconds and repeat 10-30 times.
This exercise will help you regain control of your knee and strengthen the thigh muscles ready for standing and walking.
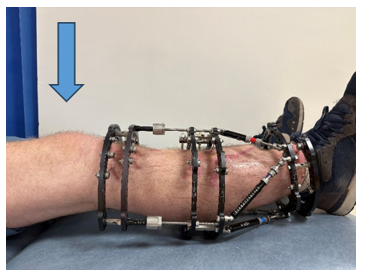
Heel lifts
- Lying down or slightly sat up, place a rolled-up towel or blanket under your knee, lift your foot up off the bed, aiming to straighten your knee completely.
- Hold for 5-10 seconds and repeat 10-30 times.
- This exercise will strengthen your thigh muscles in preparation for walking, steps and stairs.
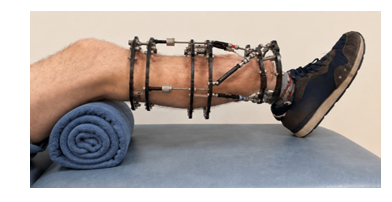
Seated Heel Lifts
- Sitting on a chair or bed, gently straighten your knee aiming for your knee to be as straight as possible.
- Try to hold the position for 5-10 seconds, then slowly lower leg down and relax.
- Repeat 10-30 times.
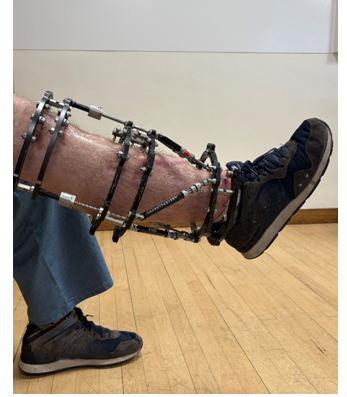
Straight Leg Raise
- Lying down or slightly sat up, squeeze your knee straight and lift your leg off the bed, approximately 10-15 cm.
- Hold for 5-10 seconds and repeat 10 - 30 times.
- This exercise will strengthen your thigh muscles in preparation for walking, steps and stairs.
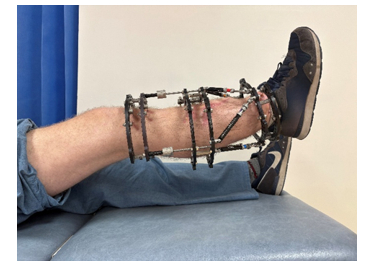
These ‘bridge’ exercises will strengthen your hip muscles, specifically your glutes but also your abdominals and hamstrings.
Bridge - Double Leg
- Lying down, bend both your knees so your feet are flat on the bed or floor.
- Keeping your head and arms relaxed, lift your bottom off the bed as high as possible.
- Try to hold the position for 5-10 seconds, then slowly lower down and relax.
- Repeat 10-30 times.
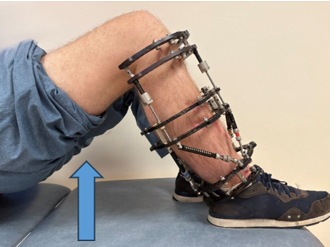
Single Leg Bridge
- Lying down, bend both your knees so your feet are flat on the bed or floor.
- To start straighten your operated leg out, keeping your knees in line.
- Keeping your head and arms relaxed, lift your bottom off the bed as high as possible.
- Try to hold the position for 5-10 seconds, then slowly lower down and relax.
- Repeat 10-30 times. Try this on both sides.
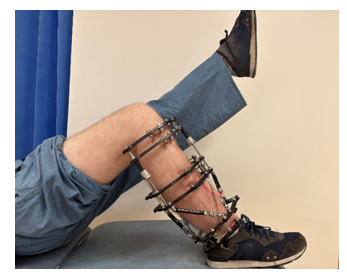
Hip Abduction
- In lying, keeping your leg straight and knee and foot pointing upwards to the ceiling.
- Slide your leg out to the side, as far as possible. Return to the starting position.
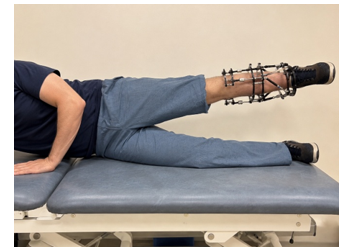
- You can also try this exercise in side lying. Keeping your leg straight, lift your leg away from your body. Be mindful not to let your leg go forwards.
- You can bend your bottom knee to help keep you stable in this position.
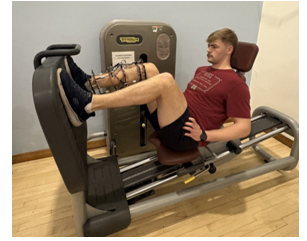
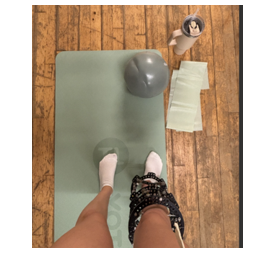
Gym Based Exercise
Your physiotherapist will guide you into additional exercises that you can also do in the gym environment as your rehabilitation progresses.
Hydrotherapy
Some patients do benefit from hydrotherapy whilst they have a frame. Your physiotherapist will discuss whether this is an option for you.
7. Follow up and Further Recovery
Follow Up Clinics
Orthopaedic
After discharge, you will receive an outpatient appointment. These appointments will be regular while you are completing your frame prescription. Clinics run twice a week and you may be seen in the consultant led or specialist nurse clinic.
At this appointment, you will be required to have an X-ray so please attend 30 minutes before your appointment time. Please check in first at reception, go for your X-ray and then return to reception in clinic 1 to inform them that you have returned.
If your frame prescription runs out before your next clinic appointment, do not worry you will be given another prescription after your X-ray at the next appointment if you still need one. If you are moving clickers or dice do not stop moving those until the team instruct you to do so.
Physiotherapy
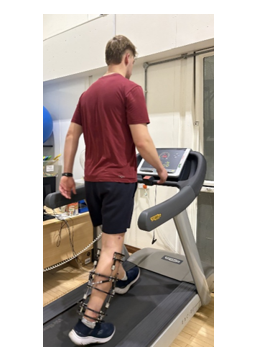
After discharge, the ward therapy team will refer your ongoing physiotherapy to your local team. The specialist limb reconstruction physiotherapist will oversee this and be available to offer advice and guidance to you and your local team.
The specialist limb reconstruction physiotherapist is also available during follow up clinics. In order to check your progress, you may also need to be seen during your clinic review and if so, you will be booked in for this.
We also offer a weekly exercise class for those in fixators, which your physiotherapist will discuss with you.
Research
When you are in clinic you will be asked to complete questionnaires, this helps us monitor and review our service and your progress.
Frame Removal
This decision is made by the Limb Reconstruction Consultant when it is the correct time to remove your frame. Once the decision is made you will be consented in clinic and listed for surgery.
All frames are removed in theatre under heavy sedation and you will be asleep.
These lists are normally on a Saturday and the Specialist Nurse will contact you with a date to come in. You go to the Day Surgery Unit for 07:00, nil by mouth as you are instructed in your phone call.
Please do not forget to bring your consent form with you on the day.
This is a day surgery procedure so you will go home on the same day. When you come back from theatre your leg is normally in a bulky bandage which you can remove yourself at 3 days post surgery.
You will be booked back into clinic 6 weeks later to have an xray and for the team to review your progress.
Physiotherapy after frame removal
After your frame has been removed further physiotherapy will be required to ensure you meet your goals. Your goals may be returning to work and leisure activities and depending on your situation these may be similar to before your injury or completely new.
Some people feel worried about having their frame removed, please talk to the team or your supporters if you are feeling this so they can support you.
You may need to return to using a different walking aid or a walking aid more immediately after removal.
You may experience pain, stiffness and discomfort throughout your joints and muscles.
Please let us know if you do not have physiotherapy organised once your frame is removed. This may be at your local centre or here at Addenbrooke’s, depending on your location.
8. Resources and Contacts
Useful Resources
- Citizens advice (opens in a new tab)
- Caring together (opens in a new tab)
- The sleep charity (opens in a new tab)
- Physiotherapy (Outpatient)
- Therapies for anxiety and depression (opens in a new tab)
- Ageuk - falls (opens in a new tab)
- conditions/falls (opens in a new tab)
- Live-well/eat-well (opens in a new tab)
Contacts
Clinical Nurse Specialist: Lizzie Shirland
- Email: elizabeth.shirland@nhs.net
- Telephone: 07759135036. Please do not leave messages on this phone just email
Clinical Specialist Physiotherapist: Charlotte Oakman
- Email: charlotte.oakman3@nhs.net
- Telephone: 01223 216633
Clinic 1 Addenbrooke’s Hospital:
- 01223 257094
- Ward C8: 01223 217279
- Ward D8: 01223 217282
- Inpatient Physiotherapy Team: 01223 216104/216989
- Addenbrooke’s Outpatient Physiotherapy Department: 01223 216633
Notes
_______________________________________________________________________________________________________________________________________________________________________________________________________________________________________________________________________________________________________________________________________________________________________________________________________________________________________________________________________________________________
We are smoke-free
Smoking is not allowed anywhere on the hospital campus. For advice and support in quitting, contact your GP or the free NHS stop smoking helpline on 0800 169 0 169.
Other formats
Help accessing this information in other formats is available. To find out more about the services we provide, please visit our patient information help page (see link below) or telephone 01223 256998. www.cuh.nhs.uk/contact-us/accessible-information/
Contact us
Cambridge University Hospitals
NHS Foundation Trust
Hills Road, Cambridge
CB2 0QQ
Telephone +44 (0)1223 245151
https://www.cuh.nhs.uk/contact-us/contact-enquiries/