

Contents
- Introduction
- Immediate Post-Surgery Guidance (Day After Surgery to 2 Weeks)
- Short-Term Recovery Guidance (2 to 6 Weeks After Surgery)
- Mid-Term Recovery Guidance (6 to 12 Weeks After Surgery)
- Long-Term Advice (12 to 16 Weeks After Surgery and Beyond)
- Key Reminders & Team Contact Information
- Patient Physical Activity Progress Tracking Charts
Introduction
You have been given this leaflet because you have been given a spinal cord stimulator implant. The leaflet explains what activities are safe for you to do following your implant what to avoid while the wounds heal and which physiotherapy exercises can support your recovery. We suggest that you share this information with your family and any friends or carers who may be helping and supporting you.
Why do I need to do these exercises?
These exercises support your recovery after your spinal cord stimulator implant. They aim to gently improve strength, flexibility, circulation, and confidence with movement, while protecting the stimulator leads during healing.
When should I start these exercises?
Exercises are grouped into different time periods following your surgery. This allows your activity to increase gradually and safely as healing progresses.
It is very important to only complete the exercises listed for your current stage of recovery.
How often should I do these exercises?
- Start with only 3-5 repetitions of each exercise.
- Gradually increase repetitions to the target range as you feel stronger and more comfortable.
- You do not need to exercise every day.
- Aim to complete gentle exercises around three times per week.
A record chart can help you keep track of how many repetitions you complete each day.
Are there any risks?
- Some exercises may feel uncomfortable at first, which is normal and should improve over time.
- These exercises should not cause a pain flare-up if you pace yourself.
- If an exercise significantly increases your pain:
- Stop that exercise
- Try a different one instead
- Do not push through pain in the early stages.
- At the same time, gentle movement is important for recovery, so try to keep active within your limits.
Which exercises can I do?
Below are safe physiotherapy exercises suitable at different stages of recovery.
Day After Surgery to 2 Weeks After Your Procedure
During the first two weeks, your activities should be gentle and controlled to protect the stimulator leads while healing begins.
- You may walk, sit, and stand. When moving (including in bed), try to keep your back reasonably straight and avoid twisting.
- Do not lift your arms above shoulder height.
- Avoid sitting in a slumped position or bending your upper back.
- Avoid fully twisting your spine.
- For upper spine stimulators, this includes turning your head fully to one side.
- You may carry light items only (up to 2 lbs or 2.5kg).
- Gradually increase this over the first two weeks (for example, building up to lifting a filled kettle).
0–2 Weeks After Surgery Physical Activity
Focus on circulation, gentle muscle activation, and maintaining movement without bending or twisting.
Exercises
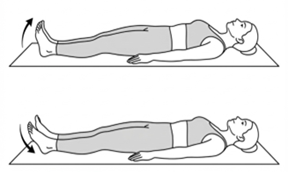
- Ankle pumps (any position)
- Lying on your back or sitting.
- Bend and straighten your ankles briskly.
- Repeat 5-10 times.
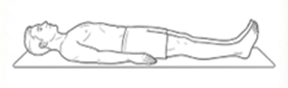
- Gluteal squeezes (lying on your back)
- Lie on your back.
- Squeeze your buttocks and hold 2-3 seconds.
- Repeat 5-10 times.
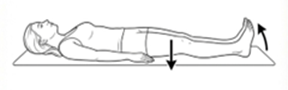
- Static quadriceps contractions (lying on your back)
- Lie on your back with your knees straight.
- Bend your ankles and press the back of your knees against the floor by using your front thigh muscles. At the same time squeeze your buttock muscles.
- Hold the tension for 2-3 seconds and then relax.
- Repeat 5-10 times.
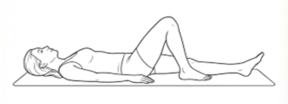
- Static hamstring contractions (lying on your back)
- Lie on your back with your legs bent. Place one heel against the floor.
- Push the heel towards the floor as if trying to bend your knee further. There should be no movement, but the hamstring muscles should tense. Hold the tension for 2-3 seconds and then relax.
- Repeat 5-10 times.
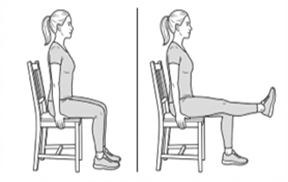
- Knee extension (sitting)
- Sit up straight on a sturdy chair, so that your feet are supported on the floor.
- Bend your ankle and straighten your knee using your front thigh muscles.
- In a controlled manner, return to the starting position.
- Repeat 5-10 times.
2–6 Weeks After Surgery
It is important to remain gently active during this phase to promote healing and maintain general health. You may gradually return to usual daily activities, including those you may have avoided due to pain. However, certain restrictions remain in place.
You should continue to avoid:
- Extreme bending or twisting of the spine.
- Turning the head fully (for upper spine stimulators).
- Raising the arms above shoulder height.
Try to keep activities close to your body, with your elbows relatively close to your sides. Avoid long-reaching movements in any direction, including overhead.
Specific Activity Guidance
Bending
- Avoid forward bending activities such as:
- Loading/unloading a washing machine or dishwasher.
- Prolonged bending to put on socks or shoes.
- Practice putting on socks and shoes without bending forward where possible.
- Consider suitable footwear and aids such as:
- A long-handled shoehorn.
- A litter picker for items on the floor.
- Sitting down to complete certain tasks may help in the short term.
Sitting
- Avoid prolonged sitting. Aim to change position or move every 15–20 minutes.
- Avoiding slumped positions or unsupported seating for 6–8 weeks.
Lifting and Carrying
- Gradually build up lifting activities.
- By 6–8 weeks, it is acceptable to lift the equivalent of two large bags of shopping being mindful of adopting a good lifting posture.
- If your job involves heavy lifting, seek advice from the neuromodulation team.
- Gradually return to activities such as vacuuming.
Driving
- You may start driving after 6 weeks once you:
- Feel able to perform an emergency stop safely.
- Are no longer taking medications that affect driving ability. (Check with your specialist nurse if unsure.)
- High-frequency SCS stimulation (silent therapy) may remain switched on while driving.
- Low-frequency stimulation (those producing a tingling sensation) must be switched off while driving.
- It is advisable to inform your insurance company about your device.
- Holders of a commercial driving licence must complete DVLA documentation. The team can assist with this.
Intimate Relationships
- These may be resumed once you feel able. Modify positions (avoid bending/twisting until after week 6). Use pillows or cushions to support you in a comfortable position, as needed.
- Anecdotally, patients report that they need to adjust positions or even temporarily switch the stimulator off if certain sensations are uncomfortable.
Walking
- You may walk as much as you feel able, pacing yourself appropriately.
- If your walking was limited before surgery, you may need to establish a new baseline.
- You may find walking poles help.
Stairs
- Stair use is acceptable and can help maintain aerobic fitness.
- Pace yourself.
- Avoid taking two steps at a time until 6–8 weeks post-surgery.
- Gentle jogging upstairs is acceptable only if this was within your fitness level before surgery.
Sleeping
- Sleeping on your side with a pillow between your knees may reduce discomfort.
- Any position is acceptable provided the spine is not twisted and arms are not raised above the head.
Jogging
- Light, gentle jogging is acceptable.
- Avoid long strides and excessive impact.
- Build up gradually and remain within your baseline fitness level.
Exercise
- Only gentle exercises and stretches should be performed during this period.
- These should be discussed with the team. Examples can be provided if required.
Activities That Are NOT Permitted (Early Recovery)
- Spinal manipulation from a physiotherapist, doctor, osteopath, or chiropractor.
- For upper spine stimulators: turning the head fully (e.g. when reversing).
- Instead, turn your body and use mirrors
- Reaching or lifting arms above head height (including swimming or hair washing – keep elbows low).
- Repetitive twisting activities (e.g. golf, cricket, dancing).
- Excessive forward bending for lower spine stimulators, such as:
- Crouching
- Slouched sitting on soft sofas
- Kneeling with the back bent (kneeling with a straight back is acceptable)
- Swimming or hot tubs for 4 months after implant.
- Sunbeds, as UV exposure can delay wound healing and may cause overheating of the implant or surrounding tissues. It is safe to sunbathe but if your battery gets too hot it will need to cool down before being charged.
2–6 Weeks After Surgery Physical Activity
Gradually build strength and control while continuing to avoid excessive bending, twisting, or reaching.
Exercises:
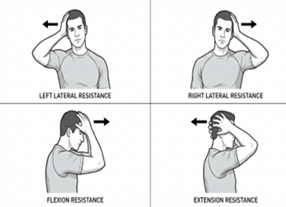
- Isometric cervical strengthening exercises
- Sitting. Tilt your head to one side while resisting the movement with your hand. Hold for 2-3 seconds. Repeat to other side.
- Repeat 5-10 times.
- Try to bend your head forward while resisting the movement with your hand. Hold for 2-3 seconds.
- Repeat 5-10 times.
- Try to bend your head backwards while resisting the movement with your hand. Hold for 2-3 seconds.
6–12 Weeks After Surgery
By six weeks, scar tissue will have begun to anchor the leads in place.
- Gentle bending and twisting of the spine may be reintroduced.
- Gradually increase activity levels at your own pace.
6- 12 Weeks Physical Activity
Introduce controlled spinal movement, balance, and functional strengthening.
Exercises
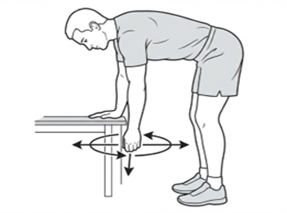
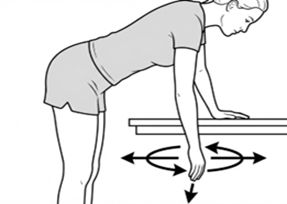
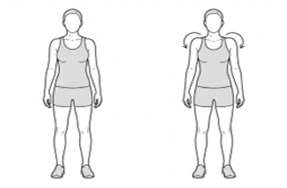
- Shoulder pendulum
- Assume position shown, letting arm hang relaxed
- Sway your whole body slowly to move arm forward and backward. Do not let the arm tense up.
- Repeat, with the arm moving side to side
- Repeat, with the arm moving in circular patterns, clockwise and counterclockwise
Repeat 5-10 times.
- Shoulder rolls
- Sit or stand.
- Roll your shoulders in both directions.
- Repeat 5-10 times.
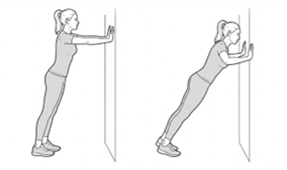
- Wall press-ups
- Stand facing a wall with your arms straight and hands on the wall. Do push-ups against the wall keeping your body in a straight line.
- Repeat 5-10 times.
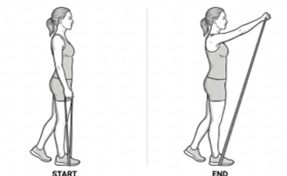
- Shoulder Flexion with Exercise Band
- Stand tall with one leg slightly in front of the other. Hold one end of an exercise band that is placed under your front foot.
- Pull the band with straight arm up to an overhead position. Return to the starting position in a controlled manner.
Note. Do not shrug your shoulders.
Repeat 5-10 times.
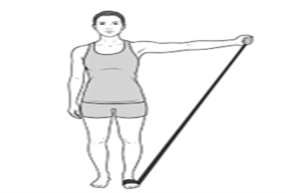
- Standing Exercise Band Shoulder Abduction
- Secure an exercise band under your feet. Stand tall with your arms straight by your side and hold the band in one hand, palm facing forward.
- Keeping your elbow straight, lift your arm out to the side up to shoulder level with thumb leading the movement. In a controlled manner, return to the starting position. Note. Keep your shoulder down.
- Repeat 5-10 times.
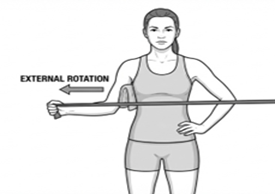
- Resisted Shoulder External Rotation
- Stand or sit. Place a rolled towel between your upper arm and side. Your upper arm should be slightly forward and your elbow at a right angle. Hold an exercise band that is securely attached to the side or hold the end in the other hand.
- Pull the band and take your forearm outwards.
- Repeat 5-10 times.
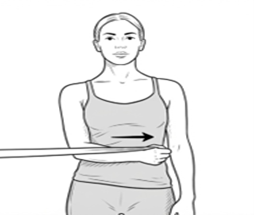
- Shoulder Internal Rotation
- Stand tall holding an exercise band attached to the side. Upper arm by your side, elbow bent to 90 degrees. Rotate your shoulder internally by bringing your palm towards your stomach. Return to the starting position in a controlled manner.
- Repeat 5-10 times.
Balance exercises
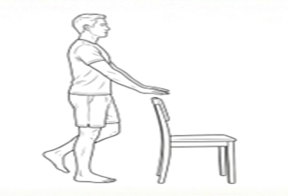
- Single leg balance
- Practice standing on one leg, keep tall. Do this near a stable chair or work surface so you can hold on if you need to.
- Repeat 5-10 times.
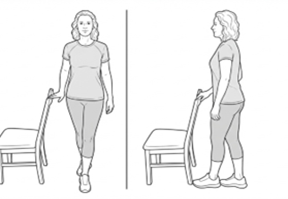
- Tandem stance
- Stand near a stable chair to help with balance if needed. Stand with one foot in front of the other. Imagine you are standing on a rope.
- Balance for as long as you can.
- Switch to the other leg in front.
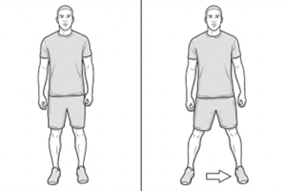
- Sidestepping
- Stand straight with your feet together. Look straight ahead. Take a big step to one side. Repeat to the other side.
- Repeat 5-10 times
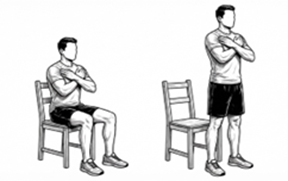
- Sit-to-stand
- Stand up by straightening your knees.
- Sit down again.
- Repeat 5-10 times.
12–16 Weeks After Surgery and Long-Term Advice
From 12 weeks onwards, the leads should be fully anchored and you may return to normal activities, building up gradually. Ongoing physical activity is beneficial for both pain management and general health.
Activities to Avoid Long Term
- Contact sports (e.g. rugby, boxing, judo, karate).
- Football:
- No heading for upper spine stimulators
- No tackling for lower spine stimulators
- Training without contact (e.g. coaching or refereeing) may be acceptable.
- Football:
- Extreme sports (e.g. bungee jumping, parachuting).
- Scuba diving deeper than 30 metres.
- Activities involving high G-forces (e.g. rollercoasters).
- Spinal manipulation by any practitioner.
- Horse riding where there is a significant risk of falling.
- Operating power tools with the stimulator switched on.
- Welding equipment: keep at least 2 metres from the power unit and 1 metre from the welding site.
- You can drive with silent therapy SCS, but if you use tingle therapy you will need to switch the SCS off or change to silent therapy.
- Trampolining, particularly somersaults and high-level training.
- Ongoing, very repetitive large movements (e.g. sprint training as a sport).
Activities That Are Acceptable
- Cricket – recreational level only; repetitive bowling may be problematic for upper spine stimulators.
- Golf – recreational play is acceptable; repetitive swing practice may be difficult for upper spine stimulators.
- Marathon running – acceptable with a gradual build-up.
- Wheelchair marathons are not recommended.
- Gardening – including heavy digging, though not as a full-time profession.
- Carpentry, plastering, decorating – acceptable in moderation, but not as a profession for upper spine stimulators due to repetitive arm movements.
- Dancing – beneficial for fitness; avoid styles with extreme arm movements if you have an upper spine stimulator.
- Gym- beneficial for fitness, build up any weights slowly.
12 Weeks and Beyond Physical Activity
Exercises
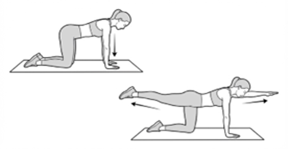
- Bird-dog
- On your hands and knees, hands under your shoulders and knees under your hips. Spine is in neutral position.
- Lift one arm. Lift only as high as you can control the position of your spine. Repeat with the other side.
Note:
- Keep your lower back in neutral position.
- Try to keep the weight shift sideways as small as possible.
3. To progress this; Lift one arm and opposite leg. Lift only as high as you can control the position of your spine.
4. Repeat 5-10 times.
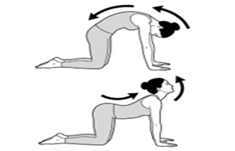
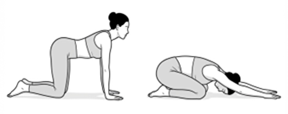
- Mid back stretch / cat / cow
- Start on your hands and knees with your knees under hips and hands under shoulders. Back in neutral position.
- Round your back, imagine pulling your belly button up to your spine, and hold the position for a moment. Return to the starting position.
- Then, let low back sag toward floor as you rotate tailbone upward to arch as shown. Return to the starting position.
- Repeat 5-10 times.
- Child’s pose
- Start on your hands and knees.
- Move backwards, bringing your buttocks towards your heels, lower your chest towards the floor.
- Hold the position for a moment, while breathing smoothly.
- Return to the starting position.
- You may not be able to get your buttocks to touch your heels, just go as far as is comfortable, with practice this will improve.
- Repeat 5-10 times.
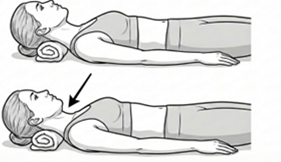
- Deep neck flexor exercises
START POSITION:
- Lie on your back with the back of the head supported by a folded towel and the pelvis and upper back relaxed.
- Slide the back of the head up the towel allowing the chin to drop towards the throat. The movement should be localised to the upper neck at the base of the skull.
- Only move as far as it feels easy to keep the back of the head on the towel and hold this position.
- Hold at the point that feels easy to control, not at the point at which strain is felt.
- Hold this position for 2-3 seconds.
- Repeat 5-10 times.
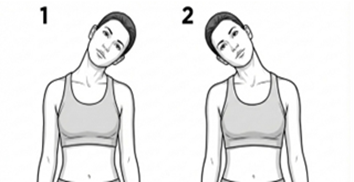
- Cervical side flexion
- Sitting or standing. Tilt your head toward one shoulder until you feel the stretch on the opposite side.
- Hold for 2-3 seconds.
- Repeat to other side.
- Repeat 5-10 times.
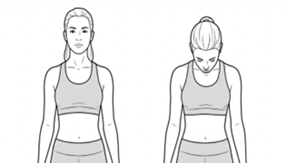
- Cervical flexion
- Sitting or standing. Bend your head forward until you feel a stretch behind your neck.
- Hold for 2-3 seconds.
- Repeat 5-10 times.
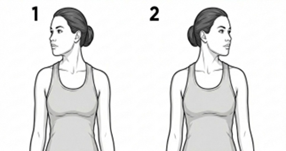
- Cervical rotation
- Sitting or standing. Turn your head to one side until you feel a stretch.
- Hold for 2-3 seconds.
- Repeat to other side.
- Repeat 5-10 times.
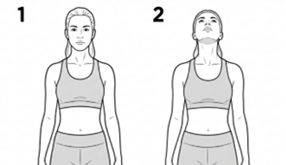
- Cervical Extension
- Sitting and standing. Bend your head backwards as far as is comfortable.
- Hold for 2-3 seconds.
- Repeat 5-10 times.
If at 12 weeks, you feel you would like more guidance and support on adapting or progressing your exercises, please ask for a referral to the pain physiotherapy team.
Key reminders
- Always pace yourself.
- Build up gradually.
- Quality of movement is more important than quantity.
- Breathing is key. Try not to hold your breath during exercises. If you notice that you are, it’s a sign the exercise may be too challenging for you right now and may need to be adjusted.
- If unsure, seek advice from the neuromodulation team. Please contact the Pain clinic via the secretaries’ number on clinic letters. Messages can be left on the answerphone service if necessary. Please note we are not a 24 hour service.
CUH Spinal Cord Stimulator (SCS) for Cervical Spine Patient Physical Activity Progress Tracking Charts
Phase 1 Tracking Log: Days 1–14 Post-Surgery
RESTRICTIONS: Keep neck and back straight. NO bending, NO fully twisting the spine (including turning your head fully to one side), and NO lifting arms above shoulder height. Max weight limit: 2 lbs / 2.5 kg.
| Exercise | Target | Mon | Tue | Wed | Thu | Fri | Sat | Sun |
|---|---|---|---|---|---|---|---|---|
| Exercise Ankle Pumps | Target 5–10 reps | Mon ___ | Tue ___ | Wed ___ | Thu ___ | Fri ___ | Sat ___ | Sun ___ |
| Exercise Gluteal Squeezes | Target 5–10 reps | Mon ___ | Tue ___ | Wed ___ | Thu ___ | Fri ___ | Sat ___ | Sun ___ |
| Exercise Static Quadriceps |
Target
5–10 reps (2-3s hold) |
Mon ___ | Tue ___ | Wed ___ | Thu ___ | Fri ___ | Sat ___ | Sun ___ |
| Exercise Static Hamstrings | Target 5–10 reps (2-3s hold) | Mon ___ | Tue ___ | Wed ___ | Thu ___ | Fri ___ | Sat ___ | Sun ___ |
| Exercise Knee Extension (Sitting) | Target 5–10 reps | Mon ___ | Tue ___ | Wed ___ | Thu ___ | Fri ___ | Sat ___ | Sun ___ |
Phase 2 Tracking Log: Weeks 2–6 Post-Surgery
RESTRICTIONS: No extreme bending/twisting. No turning the head fully. No lifting arms above shoulder height. Keep activities close to your body and elbows close to your sides. Avoid long-reaching movements.
| Exercise | Target | Mon | Tue | Wed | Thu | Fri | Sat | Sun |
|---|---|---|---|---|---|---|---|---|
|
Exercise
Isometric Cervical Side Tilts |
Target
5–10 reps (2-3s hold) |
Mon ___ | Tue ___ | Wed ___ | Thu ___ | Fri ___ | Sat ___ | Sun ___ |
| Exercise Isometric Cervical Forward Bends | Target 5–10 reps (2-3s hold) | Mon ___ | Tue ___ | Wed ___ | Thu ___ | Fri ___ | Sat ___ | Sun ___ |
|
Exercise
Isometric Cervical Backward Bends |
Target
5–10 reps (2-3s hold) |
Mon ___ | Tue ___ | Wed ___ | Thu ___ | Fri ___ | Sat ___ | Sun ___ |
Phase 3 Tracking Log: Weeks 6–12 Post-Surgery
GOAL / DIRECTIONS: Gentle bending and twisting of the spine may be slowly reintroduced. Reintroduce movements at your own pace.
| Exercise | Target | Mon | Tue | Wed | Thu | Fri | Sat | Sun |
|---|---|---|---|---|---|---|---|---|
| Exercise Shoulder Pendulum | Target 5–10 reps | Mon ___ | Tue ___ | Wed ___ | Thu ___ | Fri ___ | Sat ___ | Sun ___ |
| Exercise Shoulder Rolls | Target 5–10 reps | Mon ___ | Tue ___ | Wed ___ | Thu ___ | Fri ___ | Sat ___ | Sun ___ |
| Exercise Wall Press-ups | Target 5–10 reps | Mon ___ | Tue ___ | Wed ___ | Thu ___ | Fri ___ | Sat ___ | Sun ___ |
| Exercise Shoulder Flexion (Exercise Band) | Target 5–10 reps (No shrugging) | Mon ___ | Tue ___ | Wed ___ | Thu ___ | Fri ___ | Sat ___ | Sun ___ |
|
Exercise
Shoulder Abduction (Exercise Band) |
Target 5–10 reps | Mon ___ | Tue ___ | Wed ___ | Thu ___ | Fri ___ | Sat ___ | Sun ___ |
| Exercise Resisted Shoulder External Rotation | Target 5–10 reps | Mon ___ | Tue ___ | Wed ___ | Thu ___ | Fri ___ | Sat ___ | Sun ___ |
|
Exercise
Resisted Shoulder Internal Rotation |
Target 5–10 reps | Mon ___ | Tue ___ | Wed ___ | Thu ___ | Fri ___ | Sat ___ | Sun ___ |
| Exercise Single Leg Balance | Target 5–10 reps | Mon ___ | Tue ___ | Wed ___ | Thu ___ | Fri ___ | Sat ___ | Sun ___ |
| Exercise Tandem Stance |
Target
Max controlled hold |
Mon ___s | Tue ___s | Wed ___s | Thu ___s | Fri ___s | Sat ___s | Sun ___s |
| Exercise Sidestepping | Target 5–10 reps | Mon ___ | Tue ___ | Wed ___ | Thu ___ | Fri ___ | Sat ___ | Sun ___ |
| Exercise Sit-to-Stand | Target 5–10 reps | Mon ___ | Tue ___ | Wed ___ | Thu ___ | Fri ___ | Sat ___ | Sun ___ |
Phase 4 Tracking Log: Weeks 12–16 and Beyond
RESTRICTIONS: Observe permanent restrictions: No contact/extreme sports. Football: No heading for upper spine stimulators. No forceful spinal manipulation. Power tools off when stimulator is on.
| Exercise | Target | Mon | Tue | Wed | Thu | Fri | Sat | Sun |
|---|---|---|---|---|---|---|---|---|
| Exercise Bird-Dog | Target 5–10 reps | Mon ___ | Tue ___ | Wed ___ | Thu ___ | Fri ___ | Sat ___ | Sun ___ |
| Exercise Cat / Cow Stretch | Target 5–10 reps | Mon ___ | Tue ___ | Wed ___ | Thu ___ | Fri ___ | Sat ___ | Sun ___ |
| Exercise Child’s Pose | Target 5–10 reps | Mon ___ | Tue ___ | Wed ___ | Thu ___ | Fri ___ | Sat ___ | Sun ___ |
| Exercise Deep Neck Flexor Exercises | Target 5–10 reps (2-3s hold) | Mon ___ | Tue ___ | Wed ___ | Thu ___ | Fri ___ | Sat ___ | Sun ___ |
| Exercise Cervical Side Flexion |
Target
5–10 reps (2-3s hold) |
Mon ___ | Tue ___ | Wed ___ | Thu ___ | Fri ___ | Sat ___ | Sun ___ |
| Exercise Cervical Flexion | Target 5–10 reps (2-3s hold) | Mon ___ | Tue ___ | Wed ___ | Thu ___ | Fri ___ | Sat ___ | Sun ___ |
| Exercise Cervical Rotation |
Target
5–10 reps (2-3s hold) |
Mon ___ | Tue ___ | Wed ___ | Thu ___ | Fri ___ | Sat ___ | Sun ___ |
| Exercise Cervical Extension | Target 5–10 reps (2-3s hold) | Mon ___ | Tue ___ | Wed ___ | Thu ___ | Fri ___ | Sat ___ | Sun ___ |
Important Daily Reminders:
- Start with only 3–5 repetitions of each exercise, building up to the target range over time.
- Quality of movement is always more important than quantity. Do not push through pain.
- Breathing is key. Never hold your breath. If you are, it means the exercise is currently too difficult.
- Leave boxes blank on your rest days! You only need to choose 3 active days each week.
My Chart
We would encourage you to sign up for MyChart. This is the electronic patient portal at Cambridge University Hospitals that enables patients to securely access parts of their health record held within the hospital’s electronic patient record system (Epic). It is available via your home computer or mobile device.
More information is available on our website.
Contacts/Further information
Please contact the Pain clinic via the secretaries’ number on clinic letters. Messages can be left on the answerphone service if necessary. Please note we are not a 24 hour service.
Privacy & dignity
Same sex bays and bathrooms are offered in all wards except critical care and theatre recovery areas where the use of high-tech equipment and/or specialist one to one care is required.
We are smoke-free
Smoking is not allowed anywhere on the hospital campus. For advice and support in quitting, contact your GP or the free NHS stop smoking helpline on 0800 169 0 169.
Other formats
Help accessing this information in other formats is available. To find out more about the services we provide, please visit our patient information help page (see link below) or telephone 01223 256998. www.cuh.nhs.uk/contact-us/accessible-information/
Contact us
Cambridge University Hospitals
NHS Foundation Trust
Hills Road, Cambridge
CB2 0QQ
Telephone +44 (0)1223 245151
https://www.cuh.nhs.uk/contact-us/contact-enquiries/