This booklet has been written to provide you, your family and/or carers, with the information you need when using a Tandem t:slim X2 insulin pump.
Please refer to the additional closed loop supplement if using the Tandem t:slim X2 with continuous glucose monitoring (CGM) in Control IQ hybrid closed loop/ automated insulin delivery.
Contents
- Key points
- Pump Insurance
- Diabetes pump team contact numbers
- Customer Service contact number
- Funding Requirements
- Ordering supplies
- Pump software for sharing data
- Support groups and websites
- Diabetes and driving
- The basics of how an insulin pump works
- Changing the cannula sites
- Reviewing your basal rate
- Bolus insulin and carbohydrate counting
- Reviewing your carbohydrate ratios
- Hypoglycaemia (hypo) or low glucose level
- Hypoglycaemia treatment flow chart
- Severe Hypoglycaemia
- Hyperglycaemia
- Troubleshooting the pump
- Hyperglycaemia treatment flow chart
- Sick day rules and diabetic ketoacidosis (DKA)
- Sick day rules flowchart
- Physical activity and exercise
- Taking the pump off
- When out and about
- Travel
Key points
When using an insulin pump as part of your diabetes management, it is essential to always have the following items available in case of pump failure and ensure that they remain on your repeat prescription so you can order when required:
- Back-up insulin pens for both quick acting insulin and background insulin (make sure these are in date).
- Needles for your insulin pens.
You will also need a copy of your latest pump settings. These are used to calculate what dose of insulin you need to take if you must go back to using insulin pens. The pump team can help you work out what doses to take if you are not sure.
In addition, please ensure that you have the following items (in date) at home and on your repeat prescription in case you are unwell, your glucose levels are running high for a period of time, or you have a severe episode of hypoglycaemia:
- Blood ketone meter.
- In date blood ketone strips.
- A copy of the sick day rules.
- Diabetes pump team emergency contact details.
- Glucagon injection kit (in date – stored in the fridge).
Please check your pump regularly for any damage and report to your pump company if you have any issues. In the event of a pump failure, the company should offer a replacement pump if it is within its 4 year warranty period. Pumps are upgraded every 4 years providing funding requirements are met. If your pump upgrade is deferred due to unmet requirements, the pump team will provide guidance on changing back to insulin pens should your pump fail.
Pump Insurance
To cover you against accidental damage, please ensure you have insured your insulin pump. You can insure the pump using a dedicated insulin pump insurance company (opens in a new tab), or you can add it to your contents insurance as a ‘specified item’ for all risks.
Diabetes pump team contact numbers
Please contact the pump team if you need advice regarding your diabetes.
If you have a problem, please do not hesitate to contact us. You can leave a voicemail on one of the numbers below. (The answerphone is checked regularly from Monday to Friday during office hours) or alternatively use MyChart.
For non-urgent queries you can message the Diabetes Educators on MyChart (preferred) or email the diabetes educator (these messages are checked Monday, Wednesday and Friday). Allow 5 working days for a response.
If you require a reply sooner, you will need to call and leave a voicemail:
Diabetes Specialist Nurse (DSN): 01223 348790
Diabetes Specialist Dietitians: 01223 348769
Type 1 Diabetes emergency/urgent out of hours service
Weekdays: 06:00 – 09:00; 16:00 – 23:00
Weekends and Bank Holidays: 06:00 – 23:00
Contact the diabetes educators/the diabetes team if you do not have this number
This service is not for technical support
Overnight, you will need to call 111 or 999
Air Liquide customer service contact number
For Tandem T:Slim X2 technical queries
Telephone: 0800 0121 560
Please note that the pump companies will not give medical advice and can only offer technical support if you are having problems with the pump.
Click here for the making diabetes easier website (opens in a new tab)
Funding Requirements
Your pump therapy is funded by your local Integrated Care Board (ICB). Insulin pump therapy costs over 4 times as much as injection therapy so you will appreciate the need to ensure that it continues to be the right therapy for you.
To secure ongoing funding from your ICB to purchase a new pump, we have an obligation to ensure that the pump is achieving the goal for which it was started. This is usually measured by an improvement in your HbA1c and/ or a reduction in hypoglycaemic episodes.
We also need to demonstrate to the ICB that you fully participate in your pump therapy. This is measured by your regular attendance at clinic appointments, keeping in touch with the pump team and using your pump appropriately.
We need to have a form of contact yearly either in person, at a clinic appointment, over the phone or by email. Our appointment system offers you a medical appointment every 18 months plus a separate pump appointment every 18 months if required. Outside of these appointments you can contact us through MyChart/ email/ phone if you need support or think that a review is required.
In situations where we cannot demonstrate an improvement in your diabetes, we may defer your pump upgrade to provide time to work with you to improve your HbA1c or reduce hypoglycaemic episodes. We usually discuss upgrades a few months before your upgrade is due to try to provide the support in good time.
Ordering Supplies
Our service manages the ordering of your pump consumables (infusion sets, reservoirs, pods, patches, etc.) on your behalf. The system is designed to be proactive and convenient:
- Trigger: Begin the process once you open your final box of supplies.
- Submission: Complete our secure online ordering form. The form requires you to specify your remaining stock and the items you wish to order.
- Confirmation & Timelines: We will confirm receipt of your request by email.
- Urgent Orders: Placed as soon as possible (normally the same day).
- Routine Orders: Placed on the first Wednesday following your submission.
- Delivery: Once the order is placed with the supplier, delivery typically takes 3–4 working days.
Managing Stock Levels and Delays
We strongly advise submitting your request as soon as you open your final box. This provides a 3 to 4 week window that allows us to manage any potential supplier stock shortages or delivery delays.
- If you have more than one full box of supplies remaining, we will temporarily delay the order but ensure it is dispatched before you run out.
- If a major shortage or delay is anticipated, the pump company will contact you with further details. If you face a situation where you will completely run out due to a delivery delay, please contact us immediately so we can help resolve the problem.
Ordering Flexibility and Guidance
- Varying Quantities: The form allows you to detail which items you use more quickly. We aim to order quantities that will last you for the next 3 or 6 months (depending on your pump type).
- Infusion Set Trials: If you want to try a different infusion set (and there are no funding restrictions), we will order a single box initially. You can order a larger supply after confirming the new set is suitable.
- CGM Note: This ordering system only applies to pump consumables and Medtronic.
- CGM supplies. If you use prescription CGMs (Libre 2(+) or Dexcom One(+)), you must continue ordering these via prescription through your GP.
Contact the insulin pump admin team
If you have any further queries or require more details, please get in touch:
- Email: the insulin pump orders team
- Phone: Please leave a voicemail on 01223349471, and we will respond as soon as possible.
Pump software for sharing data
Alternatively, you can use Glooko:
Please set up a Glooko Personal account via the website. (opens in a new tab)
You will need to link your Glooko account to our clinic using the ProConnect code: ukaddhos
Linking your Glooko account to our clinic
1. Log into your Glooko account at my.glooko.com
2. Select “Settings” from the drop-down menu (top right on the home screen)
3. Scroll down to Account and select “+ Add New Code”
4. Select “Continue”, then enter ProConnect Code (ukaddhos) then select “Submit.”
Support groups and websites
Diabetes UK website - UK charity for people with diabetes (opens in a new tab)
Accessories for insulin pumps - Hid-in Website (opens in a new tab)
Type one style website - Accessories, under and over patches etc (opens in a new tab)
Diabetes and driving
Please refer to the Driver & Vehicle Licensing Agency – A Guide to Insulin Treated Diabetes and Driving guide by clicking on the following link (opens in a new tab).
Your glucose reading must be above 5 mmol/L before driving.
- If your glucose is under 5 mmol/L eat a carbohydrate-containing snack and then recheck your glucose.
- If your glucose is under 4 mmol/L or you feel hypoglycaemic, treat it as a hypo and do not drive until your glucose is above 5 mmol/L for >45 minutes
A sensor glucose reading is now acceptable as a check before driving. If the sensor glucose is below 4 mmol/L, the DVLA requires a finger-prick blood glucose to double check. Therefore, it remains a requirement to carry a blood glucose meter and strips with you when driving. Ensure the date and time on your glucose meter is correct as this is your evidence that you were 5 mmol/L or above before driving.
- Information can be found in the leaflet INS186 - A guide for drivers with insulin treated diabetes who wish to apply for Group 2 entitlement (bus and lorry), as well as from the DVLA and on the gov website. The INS186 leaflet explains the stages to the process. More info here (opens in a new tab).
If hypoglycaemia develops while driving, you must stop the vehicle as soon as safe to do so. Switch off the engine/turn off the vehicle, remove the keys from the ignition and move from the driver’s seat. Test your capillary blood glucose level to doucle check you are hypoglycaemic. Treat the hypoglycaemic episode until glucose is above 5 mmol/L. You must wait for 45 minutes before driving (as it takes up to 45 minutes for the brain to recover fully).
For long journeys, you should check your glucose within 2 hours of the start of your journey and every 2 hours whilst driving.
If driving multiple short journeys, you do not necessarily need to check your glucose before each additional journey if you check every 2 hours whilst driving. More frequent checking may be required if for any reason you think that there is a greater risk of hypoglycaemia.
Always keep an emergency supply of rapid-acting carbohydrate such as glucose tablets or sweets within easy reach in the vehicle.
You should carry personal identification to show that you have diabetes in case of injury in a road traffic accident.
Particular care should be taken during changes of insulin regimens, for example changing from pens to insulin pump therapy, changes of lifestyle, exercise, travel and pregnancy.
You must inform DVLA and your insurers if:
- Within the last 12 months you have more than one episode of severe hypoglycaemia (needing the assistance of another person) whilst you are awake. For Group 2 drivers (bus/lorry) one episode of severe hypoglycaemia (this means that you are not awake/conscious or you are not able to swallow safely) must be reported immediately.
- You experience an episode of severe hypoglycaemia while driving.
- You develop impaired hypoglycaemia awareness (difficulty in recognising the warning symptoms of low glucose levels).
- You or your medical team feel you are at high risk of developing hypoglycaemia.
- An existing medical condition gets worse, or you develop any other condition that may affect you driving safely.
- Do not rely on sensor glucose as it is unreliable at low glucose levels. Only blood glucose checks can be relied on – please always carry your glucometer with you.
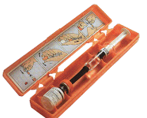
Welcome to your new pump!
The basics of how an insulin pump works
Insulin pump therapy offers the closest insulin delivery system to the way the body would naturally produce insulin without diabetes. An insulin pump uses only quick acting insulin; it delivers it in small pulses continuously throughout the day to meet your background insulin requirements; this is called basal insulin. The insulin pump can then be used to give a bolus (single larger dose) of insulin on top of the basal insulin to cover carbohydrate eaten or give a correction for a high glucose reading.
When starting on an insulin pump, a pump educator will calculate your starting settings. Over a few weeks we will work closely with you to adjust your settings to suit your daily insulin requirements.
Important information
Insulin pumps provide clever technology to better manage glucose levels, but the basics remain important. These include:
- Accurate carbohydrate counting
- Entering all carbohydrates eaten into the pump (except hypo treatment)
- Timing of the mealtime/snack insulin – a bolus given 10-15 minutes before eating is recommended
- Regular set changes
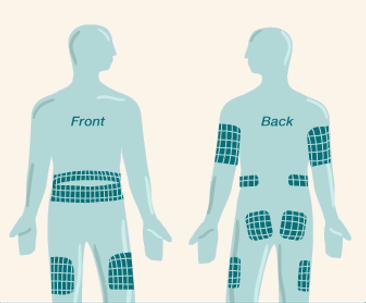
- Rotation of infusion sites
- Optimal hypo treatment
- Adjustments for physical activity
Changing the cannula sites
Your infusion set (referred to as “set”) and insulin should be changed every 48-72 hours. Steel sets should be changed every 48hrs. If you are using Humalog, the sets should also be changed every 48hrs.
Ideally it is recommended that the set change is completed before breakfast or lunch as this provides an opportunity to check the set is working and effectively delivering insulin. The concern about changing the set in the evening is that it could fail and you may not be aware of this problem overnight.
Below are some guidelines to ensure your set changes run smoothly.
- Choose a time of day to change your set when you will need a bolus soon after the change
- Wash your hands
- Check your glucose level
- Complete the set change
- IF EATING: ensure cannula is working well by checking your glucose level at 3 hours after the set change. IF NOT EATING: ensure cannula is working well by checking your glucose level at 1 hour after the set change
- If glucose levels have risen further then consider doing another set change. After you have completed a second set change – return to step 5
Painful cannula?
When doing a set change, the new cannula might temporarily be uncomfortable, but it shouldn’t hurt for more than a few minutes. If it does, it might not be in the right spot, and it’s worth giving a small bolus (with something containing carbohydrate to eat/drink!). If it still hurts, or hurts even more, then change the cannula straight away.
Cannula not sticking?
Before applying a new set, clean and dry your skin well. Avoid getting body lotion, creams or oils near the site, as these products may loosen the adhesive. If you find that the adhesive on the set still doesn’t stick well, consider spraying the area with an anti-perspirant first, allow the site to dry, ensuring it doesn’t leave a powdery residue, then insert the cannula. It is also a good idea to avoid very hairy areas or consider shaving the skin to allow the tape to stick firmly. If you find the sets tend to fall out when you become sweaty during exercise you may find something like the ‘Skin-Tac’ adhesive wipe or Cavilon barrier cream useful. These can be purchased online. If possible, avoid taking a bath, shower or swim and getting the cannula patch wet for at least two hours after applying it. There are options for tape, as well as ‘patches’ that stick over devices for an extra layer of protection or adhesion. Speak to the pump team for further advice if needed.
Insertion site irritation/ redness?
If you experience redness/itchiness at the infusion site, there are a number of things to consider:
- Be gentle in peeling back and removing your cannula. You can try a ‘Lift plus’ or ‘TacAway’ spray/wipe, baby oil or olive oil to help if needed.
- Ensure you rotate where you place your cannula. The adhesive will often remove several layers of skin when removed and will need time to rest and heal.
- If your skin becomes red and itchy underneath the sticky tape, try applying some tea tree oil or a small amount of topical steroid cream onto the site once the cannula is removed. If the redness and itchiness persist, contact the pump team for advice.
- If there is pain, pus, warmth, or spreading redness that persists for 1-2 days after your cannula is removed, please contact your GP for advice. You may have an infection and need antibiotics to treat it.
Please remember that rotating infusion sites is important to prevent lipohypertrophy (lumpy sites) and allow good insulin absorption.
Reviewing your basal rate
For most people, basal rates vary across the day, and can change with time depending on changes in lifestyle or work. It can take time to work out the right basal rate, but it is important to spend time doing this, as well as checking it every so often, as the amount of insulin that your body needs changes all the time. You may find that you need to check more often if you have a change of job and especially if a work day is very different to a non-work day, or if you are going through a particularly stressful period or you have changed your activity levels such as taking up a new exercise regimen.
It is important to ensure your basal rates are correct before you consider making changes to your mealtime ratio or correction factor.
The theory is, if your basal rate is right then you could go all day without eating and your glucose would remain more or less the same!
How does it work?
An insulin pump allows you to program varying basal rates over 24 hours. The pumps allows you to change the amount of insulin delivered every 60 minutes – that could add up to 24 different rates in one day, but most people only need 4 to 6 different rates per day.
Remember: due to the action of quick acting insulin and the way it is delivered by the pump, a change in your basal rate will take effect 90-120 minutes later. For example, the basal rate set at midday will take effect between 1pm and 2pm.
Recommendations for checking your basal rates:
- We suggest starting with your overnight basal rates
- We suggest doing these checks a few times on days that are similar to ensure there is a pattern before you make any changes
- Ideally your glucose level at the start of each check should be between 5 and 10 mmol/L (up to 12 mmol/L can work)
- Choose a day to basal check when you:
- Have not had a hypo of 3.5 mmol/L or below in the past 12 hours
- Have not been significantly more active than normal
- Have not been unwell or are under more stress than usual
- Have not had a significant amount of alcohol in the past 12-24 hours
- Abandon this check if you have a hypo or if your glucose levels go above 12 mmol/L and correct
See the following table for a step-by-step guide on checking your basal rates:
| Time frame | What to do | When to check glucose if not wearing a sensor |
|---|---|---|
| Overnight check |
What to do
Begin review if pre bed glucose is 5-10 mmol/L Eat an evening meal that contains 50g or less carbohydrate that you are confident you will count accurately Do not consume any food or carb- containing drinks for the rest of the evening. Do not exercise |
When to check glucose if not wearing a sensor
3-4 hours after evening meal Bedtime (if not the same time as above) 2-3am On waking |
| Morning check |
What to do
Begin review if pre-breakfast glucose is between 5-10 mmol/L Skip breakfast Eat no food until lunch |
When to check glucose if not wearing a sensor On waking and every 2 hours until lunch |
| Afternoon check |
What to do
Begin review if pre-lunch glucose is 5-10 mmol/L Eat a breakfast that contains 50g or less carbohydrate that you are confident you will count accurately Skip lunch No food or carb containing drinks until evening meal |
When to check glucose if not wearing a sensor
3-4 hours after breakfast Then every 2 hours until evening meal |
| Evening check |
What to do
Begin review if pre-dinner glucose is 5-10 mmol/L Eat a meal that contains 50g or less carbohydrate that you are confident you will count accurately Do not have an evening meal or carb-containing drinks Eat a late snack if needed |
When to check glucose if not wearing a sensor
3-4 hours after lunch Every 2 hours until your late snack |
If the glucose levels rise or fall more than 2 mmol/L during the review period this can suggest the basal rates need adjustment.
Adjust the basal rate for the time period 60 – 120 minutes before and up to when the rise or fall in glucose occurs
Adjust the basal rate by 10-20% or by 0.05 or 0.10 units/hr either up or down depending on whether your glucose rose or fell
Bolus insulin and carbohydrate counting
All carbohydrates consumed should be covered with an insulin bolus unless you are treating a hypo or being more active. The amount of insulin required is calculated by your pump when you enter the carbohydrate in grams into the bolus calculator. If you choose to miss a meal or eat a meal that doesn’t contain carbohydrate you do not need to give a bolus of insulin unless your glucose level is above target at the time of the meal.
You may find that if you have several snacks and insulin boluses in a row, the insulin can build up in the body and work more strongly than intended, leading to a low reading later. This is called insulin stacking. If you notice that this is a pattern, please speak to your pump educator.
It is important to count your carbohydrates as accurately as possible. You may find the Carbs and Cals book/app (by Chris Cheyette) useful with carbohydrate counting – see the images shown below. We also offer regular Carbohydrate Counting Workshops. Please ask your pump educator to add your name to the waiting list if you feel this would be helpful.

How is bolus insulin calculated?
In general the amount of bolus insulin given will depend on:
- Before meal glucose reading:
It is recommended to always check your glucose level before meals (using a sensor reading or finger prick if you don’t have a sensor). At a mealtime your pump will use your carbohydrate ratio, correction factor, glucose target, and insulin on board to decide how much insulin to give you. If your glucose levels are above target it will add a corrective dose and if your glucose levels are below target it will take an amount off your bolus to allow your readings to return to target.
Even if you plan to miss a meal you are encouraged to check your glucose so that the pump can recommend a correction if required.
2. Insulin to carbohydrate ratio:
Your pump will be programmed with your insulin to carbohydrate ratios. Although you may start with only one ratio, in time this is likely to change and vary at different times of the day.
Insulin pumps can deliver insulin in much smaller amounts compared to pens. Entering the carbohydrate you eat into your pump in the exact amount in grams (not rounding up or down, so if eating 23g carbohydrate enter 23g rather than 25g or 20g) allows you to cover the carbohydrate more accurately.
3. Insulin correction factor (sensitivity factor) and glucose target:
Your pump will also be programmed with your correction factor as well as a glucose target. Your correction factor is how much 1 unit of insulin is expected to reduce your glucose levels by. To start with it is likely you will just have one correction factor programmed but in time this might change across the day. Your glucose target can also vary at different times of the day but to start you may just have a single glucose target programmed. Generally, most people start with a target of 8 mmol/L for the first few weeks for safety and reduce this over time. Your educator will help you set your glucose target ranges.
4. Insulin on board:
The pump will also take into account the amount of bolus insulin still active and deduct this from the recommended bolus if required. This is the reason why the duration of insulin action time is typically set at 4 hours.
Delivery options for the meal bolus
Having calculated the carbohydrate content of your meal and the required insulin dose, the next step is deciding on how to give the bolus. The Glycaemic Index (GI) of a meal can affect digestion and absorption time.
When deciding on how to give your bolus you should consider the following:
- Timing of the bolus
- Delivery of the bolus - for which you will need to consider:
- The fat and protein content of the meal.
- The GI of the carbohydrate
- The size and timing of the meal
Timing of the bolus
For most meals the insulin will work more efficiently if given 10-15 minutes before you start to eat carbohydrates.
If your glucose is 3.5 mmol/L or below at the start of a meal, it is suggested that you first treat this hypo and ensure you are back in your target range before taking your meal-time bolus.
Delivery of the bolus
There are several ways to deliver the insulin bolus depending on the meal and starting glucose level. A further information sheet called ‘Insulin Pump Bolus Wave Options’ is available on request from your pump educator. Please ask if you would like this information sheet.
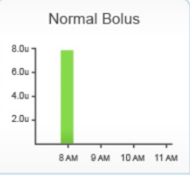
Normal/Standard
The full amount of insulin is delivered immediately to cover the carbohydrates eaten. Most people start with this delivery until their basal rates and bolus ratios are correct.
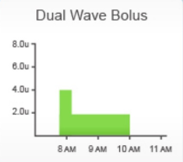
Extended Bolus
The insulin is delivered in 2 separate doses. The first bolus is delivered as a normal bolus before you eat and the rest is given over an extended length of time (30 minutes to 8 hours) as a square wave e.g. 50% given as normal and 50% given as square wave/constant supply over 2 or more hours. This gives a better insulin match for larger meals containing a high amount of carbohydrate, protein and fat for example takeaways, pizza and curry.
Reviewing your carbohydrate ratios
It is important to ensure your basal rates are correct before you consider making changes to your mealtime ratio or correction factor.
Your carbohydrate/bolus ratio determines the amount of insulin needed for carbohydrate eaten at a specific time of the day. In time your bolus ratios are likely to vary across the day. It is useful to be able to check if these are correct.
NOTE: Choose a day to do this check when you have not been unwell, stressed, had a hypo in the last 6-12 hours, been significantly more active than usual or been drinking alcohol in the last 12-24 hours.
- Check your glucose level pre-meal. You should not have given an insulin bolus within the last 4 hours before this meal.
- Choose a simple meal that you can accurately count the carbohydrates.
- Aim to eat less than 50g carbohydrate or give less than 6 units of insulin so that a normal wave can be used during the check.
- Give your usual insulin to carbohydrate bolus.
- Check your glucose level at 2 and 4 hours after the start of the meal.
| Timing | Target post meal glucose |
|---|---|
| 2-hour post meal glucose | Target post meal glucose Within 2.8 mmol/L of pre-meal glucose |
| 4-hour post meal glucose | Target post meal glucose Within 1.7 mmol/L of pre-meal glucose |
If the glucose level is out of target, review your insulin to carbohydrate ratio:
- If the glucose level rises higher than these levels increase the insulin dose by decreasing the carbohydrate ratio by 10-20% or by 0.5 to 1g
- If the glucose levels drop after a meal then reduce the insulin given by increasing the carbohydrate ratio by 10-20% or 0.5 to 1g
If at any stage during the process your glucose level drops below 4 mmol/L, abandon and have a snack. Repeat the process at another time to confirm the result.
Examples of how to change your ratio following a bolus check:
- Current insulin : carbohydrate ratio = 1unit:15g
Pre-meal glucose = 5.5 mmol/L, 2 hours post meal = 10 mmol/L
Increase the amount of bolus insulin by reducing the carbohydrate part of the ratio by 10-20% to 1unit:14g or 1unit:13g
Repeat the process to check whether the change was appropriate.
2. Current insulin : carbohydrate ratio = 1unit:8g
Pre-meal glucose = 6.3 mmol/L, 2 hours post meal = 4.1 mmol/L
Reduce the amount of bolus insulin given by increasing the carbohydrate part of the ratio by 10-20% to 1unit:9g or 1unit:10g
Repeat the process to check whether the change was appropriate.
Note:
- The lower the carbohydrate ratio, the more insulin the pump will deliver to cover carbs.
- The higher the carbohydrate ratio the less insulin the pump will deliver to cover carbs.
Hypoglycaemia (hypo) or low glucose level
Pump therapy has been shown to improve glycaemic control without increasing the frequency of hypoglycaemia.
It is important to note that signs of hypo may change whilst on a pump; they can become more subtle.
The important thing to remember is to recognise when you are low and treat hypos as quickly and effectively as possible.
Causes of hypoglycaemia
- Target glucose levels set too low
- Activity without appropriate insulin adjustment or extra carbs
- Overestimating carbohydrate at meals
- Pump settings too high for individual requirements
- Too much correction bolus for a high glucose level following a hypo
- Alcohol
- Stacking of insulin doses
- Not using the bolus calculator
- Errors when using the pump
- Delivery of insulin when eating high fat/high volume meals
Symptoms of hypoglycaemia include:
- Hunger
- Confusion
- Headache
- Increased heart rate
- Numbness/tingling
- Irritability
- Dizziness
- Slurred speech
- Tremor
- Blurred vision
- Anxiety
- Cold sweat
Treatment of hypoglycaemia
If glucose is 3.5 mmol/L or below, with or without symptoms, take 15g rapid acting carbohydrate, such as one of the following:
- 5 glucose tablets e.g. Lift tablets, Dextro Energy or 4 Glucotabs.
- 200ml of smooth pure orange juice
- 1 x 60ml Lift drink
- 2 x 25g tubes Dextrogel
Repeat the glucose measurement in 10 minutes and continue to check every 10 minutes until glucose level returns to target
Suspending the pump will not prevent/treat hypoglycaemia because the action is not quick enough. Doing this can cause high glucose levels later.
If a pattern of low glucose levels is seen at a similar time of day please check your basal rates and/or ratio as above.
However, in the case of a night-time hypo (that was not the result of drinking alcohol, increased activity the previous day or an error in meal estimation) please immediately reduce the basal rate the following evening by 10-20% overnight and discuss this with your pump educator.
Steps to prevent hypoglycaemia
- Always use the bolus calculator before meals.
- Enter the exact amount of carbohydrates eaten (do not round up).
- Check glucose levels regularly and always before driving, eating a meal and going to bed.
- Do not go to bed with a glucose level less than 5.5 mmol/L within the first 2 weeks of commencing on a pump without eating a 10g carbohydrate snack.
- If you are unable to eat a meal for which you have given a bolus of insulin, remember to make up the carbohydrate in another way e.g have a carbohydrate-containing drink like milk.
- Increased activity increases your risk of hypoglycaemia.
- Alcohol consumption will increase the risk of hypoglycaemia.
We have listed below possible causes of hypoglycaemia and possible solutions to prevent this happening again:
| Possible cause | Possible solution |
|---|---|
| Incorrect basal rate |
Possible solution
Check time on pump is correct If you use different basal patterns check you are using the correct one. Too much basal insulin for the activity and a reduced temporary rate basal is needed. Consider checking your basal rate if you notice there is a pattern of when your hypos occur. |
| Incorrect bolus given |
Possible solution
Check bolus history Check that your carbohydrate counting is accurate Check the timing of bolus for food Consider type of bolus used |
| Increased activity |
Possible solution
Consider a reduced temporary basal rate for future activity Consider extra carbs for future activity |
| Hot weather |
Possible solution
Consider a different basal pattern for holidays or summer. • Consider a reduced temporary basal rate. |
| Drinking alcohol |
Possible solution
• Consider a temporary basal overnight (up to 10am) if drinking more than 2 units or • Consider a carbohydrate bedtime snack • Consider reduced bolus at breakfast the next morning. |
| Incorrect insulin |
Possible solution
• Always check the following on a new insulin vial: insulin type, strength, expiry date and how it has been stored. |
- It is important to share this information on correct hypo treatment with close family and friends so that they can assist you, if necessary, to treat a hypo safely.
- Remember to carry quick acting carbohydrate with you at all times for treating hypoglycaemia.
- Please contact your pump educator if you are having frequent, unexplained hypoglycaemia (more than 2-3 per week) or have an episode of severe hypoglycaemia.
How to manage glucose levels which are below target but not hypo
Pre meal/snack:
When you enter a glucose level below target before eating your pump will deduct some insulin from the meal bolus to allow your glucose level to rise back into the target range. You may choose to give the bolus at the start rather than 10 minutes before.
If it is a large meal or high in fat it will take longer to digest so you may wish to split the bolus and deliver half at the start of the meal and the remaining half halfway through the meal.
In between meals:
Have a small carbohydrate snack to raise your glucose to an appropriate level without covering with insulin.
For example 5g of carbohydrates will raise your glucose level by 1-2 mmol/L, 10g by 2-3 mmol/L.
Hypoglycaemia treatment flow chart
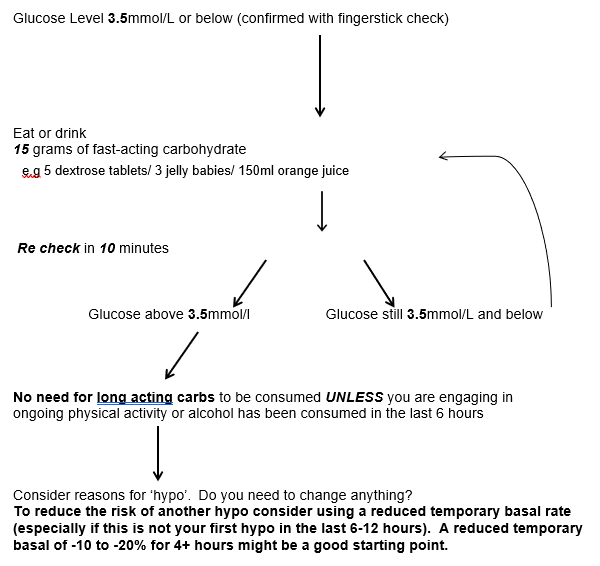
It is recommended not to correct a high glucose within 6 hours following a hypo and you may have to manually override your bolus dose to achieve this.
Severe Hypoglycaemia
Severe hypoglycaemia is classified as a hypo requiring someone else to help you treat the low glucose level, meaning you would not have been able to treat it on your own.
Examples include:
- A family member recognising your hypo when you have missed it and helping you to treat it
- An unconscious hypo requiring a GlugaGen® injection
GlucaGen® Kit
It is very important that you have a GlucaGen® Kit at home and that someone in your household knows how to administer the injection. You can ask a healthcare professional to demonstrate how the kit is used. These kits will last until their stated expiry date if stored in the fridge and for 18 months if stored out of the fridge. Please remember to mark the date on the kit when you have removed this from the fridge if you decide to keep it out of the fridge.
We also suggest you carry a GlucaGen® Kit when you travel.
If a GlugaGen® injection has been administered:
- It can take 10-15 minutes to regain consciousness
- It is very important that once you can do so, you consume 20g of rapid acting carbohydrate e.g. 200ml pure fruit juice or 200ml normal cola and follow this with 40g slower acting carbohydrates e.g. 2 slices of bread or 4 digestive biscuits. This additional carbohydrate must not be covered with insulin.
- It is worth noting you may feel or be sick after the GlucaGen® injection. If this happens, then you will need to ensure you have the amount of carbohydrate listed above again. If you feel unable to eat, you can have carbohydrate in a drink form instead which you can sip slowly.
If no-one in your household feels comfortable using the GlucaGen® kit or is worried you are taking too long to regain consciousness, they should call an ambulance.
It is very important that you make your diabetes team aware of any severe hypos that occur once commencing insulin pump therapy.
Please call the diabetes out of hours (Mon-Fri 4pm to 11pm and 6am to 9am, weekends and bank holidays 6am to 11pm) emergency number if you (or your relative/carer) require support during or following a severe hypo
Speak with the diabetes team if you do not have this number.
Hyperglycaemia
Occasional highs are not thought to cause significant harm, though they can be frustrating. If you see a pattern with high glucose levels you may benefit from doing a basal or bolus review to identify a possible cause.
Common causes of hyperglycaemia
| Possible cause | Possible solution |
|---|---|
| Incorrect basal rate |
Possible solution
• Check that the time on pump is correct • If you use different basal profiles, are you using the right one? • Consider basal rate review/basal testing |
| Incorrect bolus given |
Possible solution
• Check bolus history • Check carbohydrate counting accuracy • Check timing of bolus for food |
| Less active/ more stress/ currently unwell/ menstrual cycle | Possible solution • Consider using an increased temporary basal rate if the cause is temporary. |
| Cold weather/high altitude/dehydration |
Possible solution
• Consider a different basal profile for holidays or winter • Consider an increased temporary basal rate if the cause is temporary. • Ensure that you drink enough. |
| Insulin |
Possible solution
• Always check a new insulin vial for damage, the use-by date, strength, correct insulin type. • How long has your insulin been out of the fridge? Especially if the weather is hot. |
| Blocked cannula |
Possible solution
• Are you due a set change? • Did your glucose levels rise with a recent cannula placement? • Is the infusion site wet? Could the insulin be leaking? |
Symptoms of hyperglycaemia
- Thirst and dry mouth
- Nausea
- Urgency to urinate frequently
- Vomiting
- Frequent urination especially at night
- Dry or flushed skin
- Impaired vision
- Poor appetite
- Abdominal pains
- Muscular pains
- Difficulty breathing
- Apathy
- Odorous breath
- Fatigue, weakness
Troubleshooting the pump
If you are unsure of the cause of the high glucose levels, we would recommend following the guidelines below:
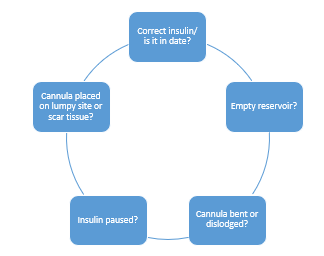
If you are concerned that your pump may not be working, please call Customer Care line immediately on 0800 0121 560.
Reduce the risks of hyperglycaemia by:
- Checking glucose levels 4-6 times daily (additional checks will be needed when unwell or exercising or pregnant)
- Using a correction bolus pre meals and pre bed as needed
- Changing your set every 2-3 days
- Checking the cannula site regularly
- Checking insulin expiry date and use within 28 days if kept at room temperature. Be aware hot temperatures can cause insulin to degrade faster
- Accurate carbohydrate counting
- Using the bolus calculator
If you have forgotten your meal bolus and remembered 2 hours later because your glucose levels are high we recommend you take a correction dose rather than cover the carbs
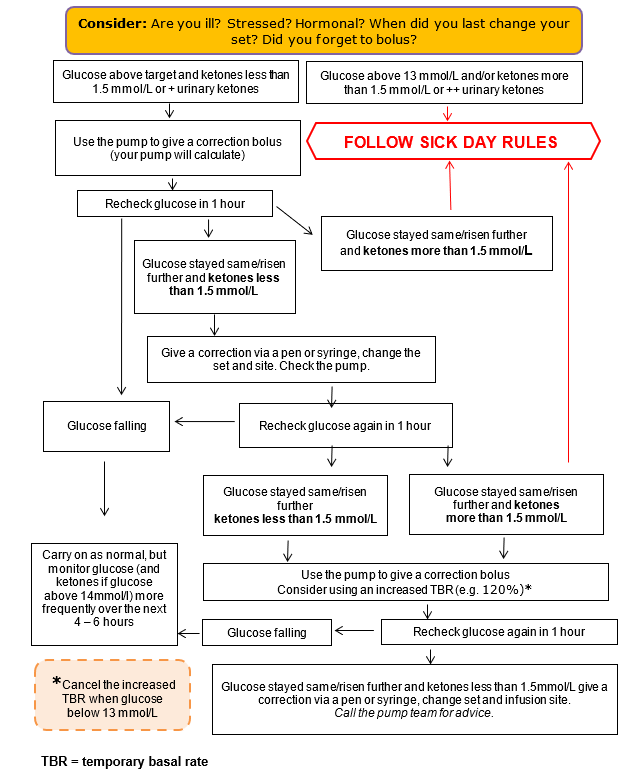
Hyperglycaemia treatment flow chart
Sick day rules and diabetic ketoacidosis (DKA)
A sudden onset of high glucose levels could become life threatening if not treated quickly. There are two common causes of rapid onset hyperglycaemia / DKA.
- Pump failure
- Illness
Monitoring your glucose levels frequently allows you to detect any significant changes in your glucose and therefore respond quickly.
When you are unwell, it is likely that your glucose levels will run higher because you become insulin resistant (caused by stress hormones) and need more insulin than normal. This response may occur even before you notice that you are unwell.
Insufficient insulin means the body cannot use glucose for energy and so fat is used as an alternative source. This breakdown of fat produces ketones and if the body cannot dispose of these ketones quickly enough, they can build up in the blood to a harmful level. This is known as diabetic ketoacidosis (DKA) and if left untreated, can progress to coma or even death.
People using an insulin pump are more at risk of DKA in the event of a pump failure or failed cannula, because a pump uses quick acting insulin which is only active for 4 hours.
Actions to treat DKA
- Take extra insulin (see sick day rules flowchart)
- Drink plenty of sugar-free fluid (100-200mls water per hour)
- Do extra monitoring of glucose and ketones including overnight
Treat and seek help for the cause of your illness
When unwell or you have 2 consecutive glucose readings above 13 mmol/L, always check for ketones and if present they should NEVER be ignored!
Things to have to hand at all times to prevent Diabetic Ketoacidosis (DKA)
- Quick acting insulin pen (in date)
- Blood glucose meter + strips (in date)
- Blood ketone meter + strips (in date)
- Extra pump supplies, e.g. reservoirs and infusion sets
The following guidelines below will help you to work out how much more insulin you will need.
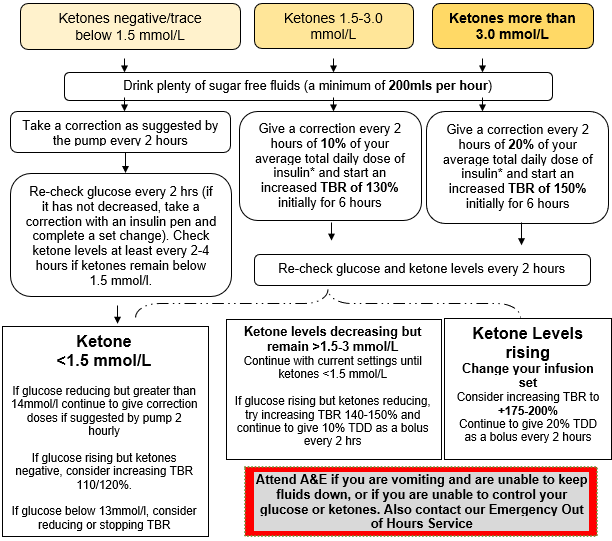
Sick day rules flowchart
Glucose higher than 13 mmol/L / you are unwell / blood ketones greater than 1.5 mmol/L or urinary ketones++
Ensure your pump is working properly. If you have any doubts, change the set and give a quick-acting insulin correction using a quick- acting insulin pen.
How to work out 10% and 20% of your Total Daily Dose (TDD) of Insulin
- Look up what your TDD is – this includes all your basal, bolus and corrective insulin in 7 days.
- You can find this on Glooko / Tandem Source app
- In the pump itself: Pump history; Delivery Summary; 7 Day Average.
- A quick way to work out what 10% of your TDD is to move the decimal point once to the left:
e.g. if TDD = 34 units then 10% = 3.4 units
- A quick way to work out what 20% of your TDD is to move the decimal point once to the left and times it by 2:
e.g. if TDD = 34 units then 10% = 3.4units x 2 = 6.8 units
- Or refer to the table below as an easy guide.
| Total daily dose | 10% (additional units) | 20% (additional units) |
|---|---|---|
| Total daily dose 20 | 10% (additional units) 2 | 20% (additional units) 4 |
| Total daily dose 30 | 10% (additional units) 3 | 20% (additional units) 6 |
| Total daily dose 40 | 10% (additional units) 4 | 20% (additional units) 8 |
| Total daily dose 50 | 10% (additional units) 5 | 20% (additional units) 10 |
| Total daily dose 60 | 10% (additional units) 6 | 20% (additional units) 12 |
| Total daily dose 70 | 10% (additional units) 7 | 20% (additional units) 14 |
| Total daily dose 80 | 10% (additional units) 8 | 20% (additional units) 16 |
| Total daily dose 90 | 10% (additional units) 9 | 20% (additional units) 18 |
| Total daily dose 100 | 10% (additional units) 10 | 20% (additional units) 20 |
Your diet when following sick day rules
If you cannot eat normally, try a light diet and eat smaller amounts more frequently e.g. every 2-3 hours. Examples include:
Bread or toast with soup/egg
Breakfast cereal
Crackers/crisp breads/plain biscuits
Milky puddings or yoghurt
Milk or fruit juice
This can be supplemented with carbohydrate containing fluids such as milky drinks and fruit juices. Aim to consume a minimum of 30g carbohydrate every 6-8 hours. Cover this carbohydrate with your normal insulin bolus.
If a light diet is not tolerated, take sugary drinks in small amounts more frequently e.g. 10-15g carbohydrate taken every 1-2 hours, for example:
- Normal fizzy drinks (flat – may be tolerated better)
- Sugar-containing drinks e.g. pure fruit juice, cordial, milk
- Lucozade Original
- Ordinary jelly
Medicines
Tablet medications often contain very small amounts of lactose but will not significantly affect glucose levels (usually <2g of lactose per day). Most liquid medications are available in a sugar-free form, but some liquids may contain significant amounts of sugar.
A single dose of a sugar containing medication is unlikely to significantly impact glucose levels. Discuss the availability of sugar-free medicines (including over-the-counter medication) with your pharmacist.
Physical activity and exercise
Now that you are on your insulin pump, you will hopefully find activity and exercise can be more easily managed because you can be a lot more creative and flexible with the way the insulin is delivered. Unfortunately, there is no one strategy that will work for everyone, so it does require you to monitor your glucose levels and try to spot patterns in how your glucose levels react to the activities you do. In time, and with a bit of practice, it will hopefully work well for you but do use your insulin pump educator for support as it can be challenging to get right.
If you exercise regularly and/or to a high level, then you may like to ask the team for the ‘Managing Exercise on an Insulin Pump’ guide for more detailed advice.
The first step in understanding how to best manage physical activity is to try to figure out how your body responds to it. Do your glucose levels drop when you’re active or in some situations do your glucose levels rise? Understanding this will help you determine how to set the pump to cope with this.
For all activity, it is considered safe to exercise with glucose levels between 7-15 mmol/L and monitor closely. If you have ketones above 1.5 mmol/L then you should not exercise but refer to the pump sick day rules. If you have a trace of ketones (0.6-1.5 mmol/L) then you should restrict your exercise to less than 30 minutes of gentle activity and give a correction dose beforehand (reduce the correction dose by 2/3 by overriding the pump).
Using the temporary basal rate (TBR) to manage activity
This is one of the best features of the pump because it allows you to temporarily turn the pump’s basal rate ‘up and down’ depending on what you want the pump to do. For example:
My glucose levels drop when I go shopping/running/walking etc.
You could try setting a reduced TBR to 50% (which will deliver only 50% of your normal basal rate) for the length of the time that you are active. We recommend setting a TBR at least 60-90 minutes before you are active so that the insulin levels can reduce in time. For example, if you plan to go shopping for about an hour at 2pm then set the reduced TBR of 50% for 3.5 hours from 12:30pm – 90 mins before, one hour during and one hour after the activity has stopped to allow your body to recover.
My glucose levels go up when I exercise.
If your glucose levels consistently go high when you do certain sports (e.g. during a competition or a very adrenaline fuelled sport) then one way to manage this might be to set an increased TBR for the duration of the activity.
As above, we recommend you set the increased TBR to start one hour before, one hour during and then on recovery for an hour until you see your glucose coming down to normal.
With both strategies, it will take practice to get the TBR rate right for the different scenarios. Your individual fitness, insulin sensitivity and exercise routines will all affect how your glucose levels react to activity. The key is to try to remember to set the TBR 60-90 minutes before the start of the activity and that the effect of the exercise can last for a while afterwards (several hours in some cases).
Making changes to the bolus insulin
You may find that you also need to change the bolus (mealtime) insulin to cope with your exercise as well as the TBR settings. If you can avoid exercising within 2-3 hours of taking a bolus of insulin then evidence has shown that this can help avoid unpredictable swings in your glucose levels (high and low levels). However, if you do want to exercise within 2-3 hours of taking your bolus insulin, then you may need to reduce this dose to prevent your glucose dropping (otherwise you are exercising at the peak of your insulin action).
For example, you eat your breakfast at 8am and are planning on going for a walk at 9am. At breakfast, the pump wants to give you a 6 unit bolus for your carbohydrate. You may want to try reducing the dose by 50%, in this case by 3 units. You may need to take more or less off your bolus dose of insulin prior to exercise, but this is a good place to start.
Managing recovery from exercise
How much glucose your body has used during an activity affects how long your body may take to recover afterwards. You may notice your body taking up more glucose for longer and/or more intense exercise sessions (by having more lows or needing to eat more) for several hours after you have stopped. This is called delayed glycogen replenishment. This means that your body is trying to replenish the stores of glucose it has used during the activity which can cause hypoglycaemia afterwards. The delayed effect can happen overnight, especially if you have:
- Started a new activity that day
- Exercised for 2-4 hours
- Done any high intensity exercise
Even if your glucose levels are high directly after exercise, they can still drop several hours later. Try setting a reduced TBR, for example 70-80% for 6 hours overnight to help manage this.
Carbohydrate for exercise
You may find that altering your insulin isn’t enough to cope with your activities. In some cases, you may need extra carbohydrate as well.
The table below details type of carbohydrate based on type of activity, but you may need to work out the amount you need for your activity through experience.
You may find you need a combination of both types of carbohydrate depending on what you are doing. Have a go at experimenting and see what works best for you.
Carbohydrate suggestions for exercise:
| Fast release carbs (shorter sessions/ events) | Carbs (g) | Slower release carbs (longer sessions/ day events | Carbs (g) |
|---|---|---|---|
| Fast release carbs (shorter sessions/ events) Jelly Babies (4 sweets) | Carbs (g) 20 | Slower release carbs (longer sessions/ day events Raisins (30g) | Carbs (g) 22 |
| Fast release carbs (shorter sessions/ events) Dextrose (4 sweets) | Carbs (g) 12 | Slower release carbs (longer sessions/ day events Jaffa Cake (each) | Carbs (g) 10 |
| Fast release carbs (shorter sessions/ events) Isotonic Gel (each) | Carbs (g) 22-25 | Slower release carbs (longer sessions/ day events Fruit bar (each) | Carbs (g) 15 |
| Fast release carbs (shorter sessions/ events) Energy Sports bar (each) | Carbs (g) 25 | Slower release carbs (longer sessions/ day events Cereal bar (each) | Carbs (g) 22 |
| Fast release carbs (shorter sessions/ events) Energy powder drink (500mls) | Carbs (g) 45-50 | Slower release carbs (longer sessions/ day events Malt loaf (1 silce) | Carbs (g) 20 |
| Fast release carbs (shorter sessions/ events) Gatorade (250ml) | Carbs (g) 15 | Slower release carbs (longer sessions/ day events Banana (medium) | Carbs (g) 15-20 |
| Fast release carbs (shorter sessions/ events) Lucozade original (100mls) | Carbs (g) 8.4 | Slower release carbs (longer sessions/ day events Flapjack (50g) | Carbs (g) 30 |
| Fast release carbs (shorter sessions/ events) Lucozade Sport (100mls) | Carbs (g) 6.4 | Slower release carbs (longer sessions/ day events Fig roll (each) | Carbs (g) 14 |
| Fast release carbs (shorter sessions/ events) Cola (150ml-mini can) | Carbs (g) 15 | Slower release carbs (longer sessions/ day events Oat cake (each) | Carbs (g) 6 |
| Fast release carbs (shorter sessions/ events) Apple Juice (120ml) | Carbs (g) 15 | Slower release carbs (longer sessions/ day events Bread roll (50g) | Carbs (g) 25 |
Taking the pump off for exercise
In some situations, you may want to take the pump off, e.g. for swimming or contact sports. You can do this for up to 60 - 90 minutes. Taking it off for much longer than this will cause your glucose levels to rise.
Taking the pump off
There may be times when you would like to remove your pump temporarily such as swimming, sex and going on holiday.
Insulin pumps should not be disconnected for more than 90 minutes unless you follow advice in the table below.
| Off the pump for: | What to do: |
|---|---|
| Up to 90 minutes |
What to do:
Check glucose levels before removing the pump and give a correction if needed using the pump. Suspend the pump while the pump is disconnected. If eating; use an insulin pen to give a quick acting insulin bolus to cover carbohydrates. When you replace the pump, check your glucose and give a correction if necessary. Ensure you resume insulin delivery on the pump. |
| Up to 4 hours |
What to do:
Check glucose before removing pump and give a correction if needed using the handset. Suspend the pump while the pump is disconnected. At 2 hours after removing the pump use your insulin pen to give a bolus of quick acting insulin equivalent to the amount of basal insulin you have missed. For example, if your basal rate is 1 unit/hour give a bolus of 2 units. If eating, use an insulin pen to give a quick acting insulin bolus to cover carbohydrates. When you replace the pump, check your glucose and give a correction if necessary. Ensure you resume insulin delivery on the pump. |
| Up to 12 hours |
What to do:
Check glucose before removing the pump and give a correction if needed using the pump. If eating use an insulin pen to give a quick acting insulin bolus to cover carbohydrates. Followed by either of the below: If your back up insulin is glargine or degludec: Every 2 hours use your insulin pen to give quick acting insulin equal to the missed basal amount for the duration that your pump is disconnected. If your back up background insulin is Humulin I: Take a dose of Humulin I at the point of removing the pump that is equal to your basal insulin dose for the next 12 hours. If you choose to replace the pump before the 12 hours is up, please run a reduced temporary basal of 0% for the remainder of time. Finally: When you replace the pump, check your glucose and give a correction if necessary. |
| 24 hours or longer |
What to do:
Check glucose before removing your pump and give a correction if needed using the pump. If eating, use an insulin pen to give a quick acting insulin bolus to cover carbohydrates. Followed by one of the below: If for any reason you do not have any back up long-acting insulin Every 2 hours use your insulin pen to give quick acting insulin equal to the missed basal insulin amount. If your back up insulin is glargine or degludec: Take a dose of long-acting insulin (glargine or degludec) at the point of removing the pump that is equal to your basal insulin dose for the next 24 hours. o If you choose to reapply the pump before the 24 hours, please run a reduced temporary basal of 0% for the remainder of the time. If your back up background insulin is Humulin I: Take a dose of Humulin I at the point of removing the pump that is equal to your basal insulin dose for the next 12 hours. You will need to do this injection twice, approximately 12 hours apart. If you choose to reapply the pump before the 12 hours, please run a reduced temporary basal of 0% for the remainder of time. Finally: When you reapply the pump check your glucose and give a correction if necessary, via your pump. |
Please note:
- If you remove your pump for more than 4 hours, close monitoring of glucose levels is recommended. Always ensure you are giving the pen insulin doses; setting an alarm every 2 hours would be recommended.
- We would recommend that you discuss any plans to remove your pump with the pump team beforehand and plan ahead where possible. Disconnecting yourself from the pump puts you at a higher risk of developing high glucose levels and forming ketones /DKA if you do not commence insulin pen injections again.
When out and about
We would encourage you to inform friends, colleagues and family members that you are using an insulin pump and have type 1 diabetes. There is no need to teach them how to use the pump BUT it is important to tell them what to do in an emergency, and where to find spare supplies.
What your colleagues/friends/relatives need to know
- How to recognise and support you treating a hypo
- Where your pump, insulin and hypo supplies are kept
- Who to contact for help and when to contact them
Supplies to be kept at work and/ or carried with you if more than 1 hour away from home
- Glucose and ketone meter/ spare sensor
- Glucose and ketone strips
- Spare cartridges and infusion sets
- Vial(s) of insulin
- Spare charging cable
- Quick acting insulin pen
- Background/ intermediate acting insulin if you are travelling away from home >12-24hrs
- Copy of sick day rules
- Copy of your pump settings
- Contact numbers for family, pump team and pump manufacturer
- Hypo treatment and extra carbohydrate containing snacks
- Travel letter (if flying/crossing borders on a train/ferry)
Travel
Ahead of travelling abroad, contact the pump team for a travel letter to support you carrying your insulin pump supplies, sharps and liquids through security. The pump team will arrange this letter free of charge.
The pump can go through metal detectors, but not x-rays, full body scanners or luggage screening machines.
It is advised to keep all your diabetes supplies with you in the cabin, not in the hold as it could freeze, which may damage them.
The Bluetooth® can remain turned on in flight, especially if you are using a connected glucose sensor.
If you are travelling to a hot/very cold climate or will be staying at very high altitude, contact your pump team for support as you are likely to need adjustments to your settings.
Remember to change the time on your pump when you reach your destination as well as when you return to the UK. For very long-haul travel e.g. to Australia, it may be worthwhile making small changes to the time every 6 hours.
Travel can be very stressful and therefore you may need to run an increased temporary basal to ensure your glucose levels are stable. Check glucose levels frequently and correct where necessary. Also remember to drink plenty of fluid.
Click here for guidance on flying with the pump (opens in a new tab)
Extra supplies for travelling
It is recommended that you take twice the amount of supplies (see above re supplies to carry if more than 1 hour from home) that you think you will use. Trips can be extended for reasons beyond your control.
Where possible divide your supplies with someone who is travelling with you or across two bags in case of theft or loss.
You will also need to carry quick acting and background insulin with you for emergency use if the pump fails. Please call the pump company in the event of your pump not working as they may be able to courier a replacement to you depending on where you are in the world.
It may be worth contacting your pump manufacturer well in advance to see if they have spare loan pumps for holidays in case of pump failure. Note this may not be possible.
We are smoke-free
Smoking is not allowed anywhere on the hospital campus. For advice and support in quitting, contact your GP or the free NHS stop smoking helpline on 0800 169 0 169.
Other formats
Help accessing this information in other formats is available. To find out more about the services we provide, please visit our patient information help page (see link below) or telephone 01223 256998. www.cuh.nhs.uk/contact-us/accessible-information/
Contact us
Cambridge University Hospitals
NHS Foundation Trust
Hills Road, Cambridge
CB2 0QQ
Telephone +44 (0)1223 245151
https://www.cuh.nhs.uk/contact-us/contact-enquiries/