Who is the leaflet for? What is its aim?
This leaflet is aimed at providing information for patients and their families / carers about mallet finger injuries and treatment required to recover from the injury.
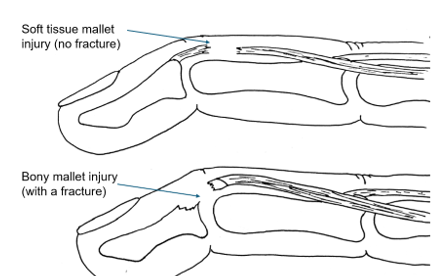
What is a mallet injury?
A mallet injury, resulting in a “mallet finger”, is damage to the extensor tendon in your finger. This tendon is responsible for straightening the tip of your finger.
There are two types of mallet injury
- The tendon tears away from its attachment to the bone (called a soft tissue mallet injury)
- A fragment of bone where the tendon is attached comes away from the main bone (called a bony mallet or avulsion injury)
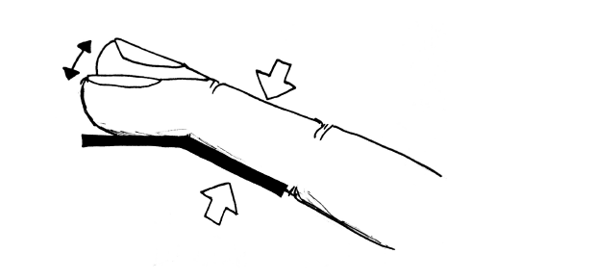
The result of either type of mallet injury is the inability to straighten the tip of the finger, which is known as an extension lag. This is shown in the illustration below;
Treatment for the injury
| Weeks post injury | Rehabilitation plan |
|---|---|
|
Weeks post injury
0-6 Bony mallet injury Or 0-8 Soft tissue mallet injury |
Rehabilitation plan
Wear splint at all times. Only remove for protected skin care and keep the joint supported in a straight position at all times. Actively move the middle joint of the finger and all other uninvolved joints on a regular basis. (Phase 1 exercises below) For swelling, keep the hand elevated, use massage and compression if needed but keep the top joint straight. Use the hand in light function as pain allows. Use ice for inflammation, heat for stiffness. |
|
Weeks post injury
Week 6 Bony mallet Week 8 Soft tissue mallet |
Rehabilitation plan
Under the therapy teams guidance, if you can actively keep the top joint straight on your own, start doing the guide board exercises below. (phase 2 exercises below) Continue to wear the protective splint at all times in between exercises. Progress to the next guide board each week over 3 weeks. Continue exercises for the uninvolved joints and swelling management Continue to use the hand in light function with the splint on. |
|
Weeks post injury
Week 9 Bony mallet injury Week 11 Soft tissue mallet injury |
Rehabilitation plan
Under the guidance of the therapy team, if you can actively keep the top joint straight on your own, start to wean off the splint in the day time. Continue to wear the splint at night and when vulnerable. Start the phase 3 exercises below. |
|
Weeks post injury
Week 13 Bony mallet injury Week 15 Soft tissue mallet injury |
Rehabilitation plan
Discontinue use of the splint. Return to normal functional use including contact sports and heavy use as pain allows. |
Most people recover well following a mallet injury and do not have any long-term functional problems. The aim of treatment is to return the fingertip to as near normal position as possible, however for some people they may always have a slight droop at the fingertip.
It is normal to experience symptoms such as pain or discomfort, swelling, stiffness or decreased strength. It may take several months for your symptoms to completely settle. The injury may take longer to heal if you have diabetes or if you smoke. If you take the splint off before advised and allow the fingertip to droop, it will affect the outcome and may result in you needing to start the splinting process again from the beginning.
Home treatments should include:
- Remove any rings from the injured finger and avoid putting them back on until the pain, swelling and bruising have all resolved.
- In the 1st few days’ ice wrapped in a tea towel for 15-20 minutes, 3 times a day will help with the pain, bruising and swelling.
- Take over the counter pain relief as needed
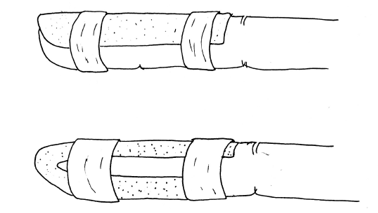
Splinting
To treat your mallet injury, you need to wear a splint to prevent your finger tip from bending to allow the tendon to heal. For a bony mallet injury, you will wear the splint all the time for six weeks. For a soft tissue mallet injury, it will be for eight weeks. However, this could be extended depending on your rate of healing.
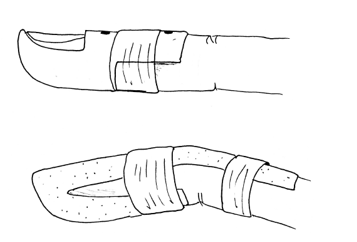
You will likely have been given a prefabricated splint in the Emergency department. It needs to fit you well, holding the top joint in a fully straight position, and still allow the middle joint of the finger to bend. If not, it will need to be replaced by the therapy team for a custom-made thermoplastic splint. The different styles of splints made are shown in the images below.
The splint will be taped on and the middle joint below the splint should be able to move freely.
Care for your splint and skin
The splint must be worn at all times, other than to wash the skin. If the skin becomes wet inside the splint, it can become sore. It’s important to wash both the finger and the splint at least once a day using the following instructions:
When you remove the splint, it is very important that the fingertip is supported and not allowed to bend. Placing it on a table top can be a good idea. To wash the finger a damp cloth or baby wipe can be used, dry thoroughly and place back into the splint. Do not take the splint off to have a bath or shower. If the fingertip is left unsupported, it will bend and affect how the tendon heals and will likely result in a permanent droop at the fingertip.
If the splint becomes too tight or too loose or becomes uncomfortable, please contact the hand therapy team as soon as possible so that it can be adjusted. If the splint is not holding the top joint in the correct position it could affect the overall result and also could mean restarting the splinting from the beginning again.
Exercises
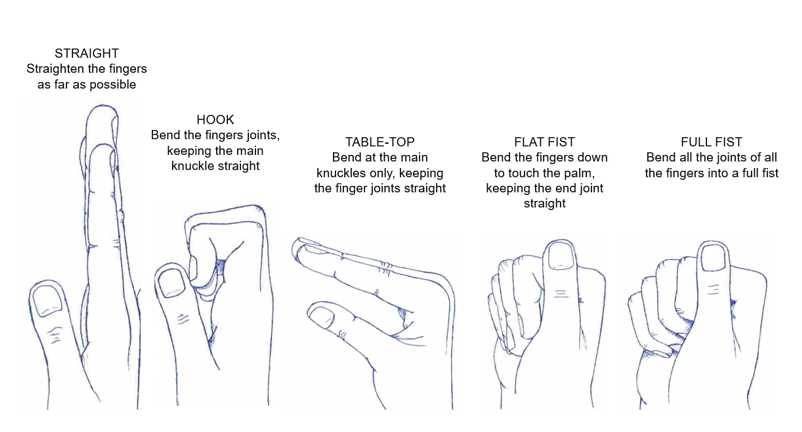
Phase 1 exercises:
- Active isolated flexion/extension of the proximal interphalangeal joint
Phase 2 exercises:
After six to eight weeks, your hand occupational therapist will show you some exercises to get your fingertip bending again.
Your tendon is similar to an elastic band and needs to be stretched gradually otherwise it can be injured again or overstretched. This can result in an on-going deformity, which can become long term.
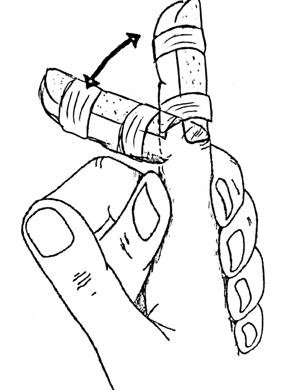
You will be given three exercise guide splints set at 10, 20 and 30 degrees so you know how far to bend the joint without compromising the tendon healing. Guidance for using these splints, including when and how to progress, is set out below.
Week one of guide board exercises
You will need to continue to wear your mallet splint at all times, removing it only to complete your exercises. These will need to be completed every two hours during the day. You will need to remove your splint and hold the guide splint you have been given by your therapist against the underside of your finger:
- Gently bend the tip of your finger into the 10 degree guide splint
- Hold the position for a count of five seconds
- Then fully straighten your finger
- Hold for a count of five seconds
- Repeat all of the above five times every two hours.
See precautions below if you are worried that your finger does not straighten after exercising.
Week two of guide board exercises
Continue to wear your mallet splint at all times except when doing exercises:
- Gently bend the tip of your finger into the 20 degree guide splint
- Hold the position for a count of five seconds
- Then fully straighten your finger
- Hold for a count of five seconds
- Repeat all of the above five times every two hours.
See precautions below if you are worried that your finger does not straighten after exercising.
Week three of exercises
Continue to wear your mallet splint at all times except when doing exercises:
- Gently bend the tip of your finger into the 30 degree guide splint
- Hold the position for a count of five seconds
- Then fully straighten your finger
- Hold for a count of five seconds
- Repeat all of the above five times every two hour
See precautions below if you are worried that your finger does not straighten after exercising.
Precautions
If you are unable to straighten your finger tip while completing your exercises, stop exercising, put your mallet splint back on and contact the hand therapy department. It is not unusual for the tendon to fatigue and / or be painful. After a period of rest the tendon should function correctly. Over time with continued exercise, the fatigue and / or pain will settle and you will see improvement in the motion of the finger. If you continue to have concerns please contact your therapist.
Week four (after starting guided exercises)
You will see your hand therapist again who will check the motion of your finger. If no concerns are identified you will be instructed to remove your splint on a gradual basis during the day initially. It is expected that you will continue to wear your splint at night and for “at risk activities” (e.g contact sports) for another three weeks. At this stage you can start phase 3 exercises.
Phase 3 exercises:
- Finger active tendon glides: complete the sequence below,
Week seven (after starting guided exercises)
You will be see your hand therapist again for a final review if no complications are identified. Your therapist may provide you with additional exercises to maximise your finger movement as well as the strength of your finger. Your therapist will advise you when to discard the splint and resume normal hand use.
Things to look out for
The pictures below show possible complications from a mallet injury – an extension lag or flexion contracture (an inability to straighten the finger as normal), and a swan neck deformity (the injured joint over-extends and the end joint sits in a bent position).
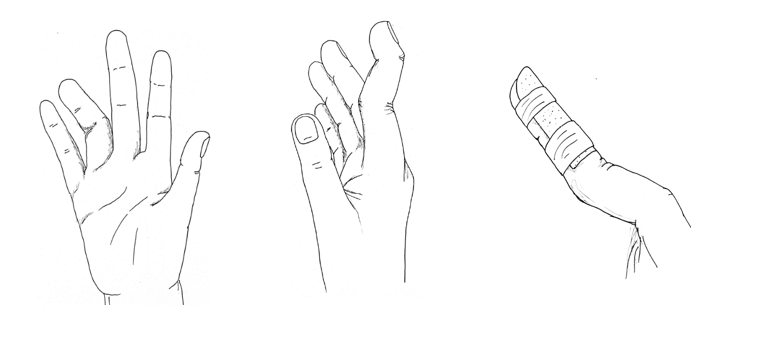
If you are developing any of the above, or have significant pain or very limited movement that is not improving, please contact the hand therapy clinic. If you already have a video call booked in please contact the clinic so we can book in a face to face appointment instead.
Returning to driving
You can drive when you feel you are safe to do so and feel you have full control of the vehicle. It is entirely your own responsibility and we cannot give you permission to drive. Please refer to the DVLA website regarding fitness to drive, and liaise with your car insurance company.
Returning to work
Office work – return when you feel comfortable and work within pain limits.
Manual/heavy work requiring use of all fingers – no heavier use or tight gripping until you no longer need to wear the splint (at least 6 weeks post start of guide board exercises)..
Returning to sport
Contact sports should be avoided until 6-7 weeks after starting the use of the guide boards.
Smoking cessation
Smoking prolongs fracture healing time. In extreme cases it can stop healing all together. Stopping smoking during the healing phase of your fracture will help to optimise your recovery.
For advice on smoking cessation and local support available please see the website: smokefree.nhs.uk, or discuss this with your GP.
Contact Information
If you have any problems or concerns during your treatment please contact your hand therapist:
Name:
Contact number: 01223 216769.
References / Sources of evidence
NHS Conditions - Mallet Finger (opens in a new tab)
- Alla et al (2014). Current concepts: mallet finger. Hand. 9 (2), 138-144.
- Bendre et al (2005). Mallet Finger. J Am Acad Orthop Surg. 13 (5), 336-344.
- Botero et al. (2016). Review of Acute Traumatic Closed Mallet Finger Injuries in Adults. Archives of Plastic Surgery. 43 (2), 134-144. Easton C. (2008). A mallet Injury Case Study with Recommendations for Practice. The British Journal of Hand Therapy. 13 (1), 21.
- Handoll and Vaghela (2004). Interventions for treating mallet finger injuries. Cochrane Database of Systematic Reviews.
We are smoke-free
Smoking is not allowed anywhere on the hospital campus. For advice and support in quitting, contact your GP or the free NHS stop smoking helpline on 0800 169 0 169.
Other formats
Help accessing this information in other formats is available. To find out more about the services we provide, please visit our patient information help page (see link below) or telephone 01223 256998. www.cuh.nhs.uk/contact-us/accessible-information/
Contact us
Cambridge University Hospitals
NHS Foundation Trust
Hills Road, Cambridge
CB2 0QQ
Telephone +44 (0)1223 245151
https://www.cuh.nhs.uk/contact-us/contact-enquiries/